
Privileged Identity Management
Privileged Identity Management (PIM) is a service in Microsoft Entra ID that enables you to manage, control, and monitor access to important resources in your organization. These resources include those in Microsoft Entra ID, Azure, and other Microsoft Online Services such as Microsoft 365 or Microsoft Intune. This blog has been written to help those who want to set up just-in-time access for Azure resources and provide access to the subscription level only.
Why do we need PIM for Azure Resources?
Better Security for Important Access
PIM ensures that only the right people can access essential systems when needed and only for a short time. This reduces the chances of misuse by someone with powerful access.
Giving Only the Minimum Access
PIM ensures that people only have the access they need to do their jobs. This means they can’t access anything unnecessary, keeping things secure.
Time-Limited Access
With PIM, users can get special access for a set period. Once the time is up, the access is automatically removed, preventing anyone from holding on to unnecessary permissions.
Access When Needed
PIM gives Just-in-Time (JIT) Access, meaning users can only request higher-level access when needed, and it is automatically taken away after a set time. This reduces the chances of having access for too long.
Approval Process for Access
PIM lets you set up a process where access needs to be approved by someone (like a manager or security) before it’s given. This adds another layer of control.
Tracking and Monitoring
PIM keeps detailed records of who asked for and received special access, when they accessed something, and what they did. This makes it easier to catch any suspicious activities.
Temporary Admin Access
Instead of giving someone admin access all the time, PIM allows it to be granted for specific tasks. Admins only get special access when needed, and for as long as necessary, so there is less risk.
Meeting Legal and Security Standards
Some industries require companies to follow strict rules (like protecting personal information). PIM helps meet these rules by controlling who has access and keeping track of it for audits.
How to set up PIM in Azure
Create Security Group & Map to Subscriptions
- Step 1: Create security groups for each Azure subscription to manage access control.
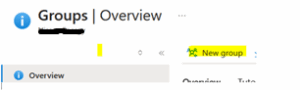
- The security groups are derived from Azure Entra IDs. As illustrated in the snapshot below, use the global search box in the Azure portal to find the appropriate services.

- Step 2: Select the service you need, then click New Group to create a new security group. Fill in all necessary details, including group name, description, and any other required attributes.
-
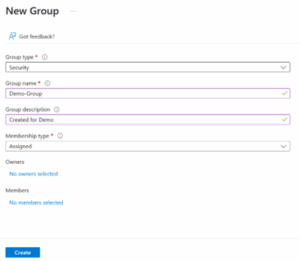
- Create a separate group for each subscription.
- If your account includes two subscriptions, such as Prod and Non-Prod, create distinct security groups for each subscription. This allows users to request access to a specific subscription.
- Make the user a member of both groups, enabling them to choose which subscription resources they wish to activate.
- The screenshot below shows that the Demo-Group security group will be created and assigned to its corresponding subscription.
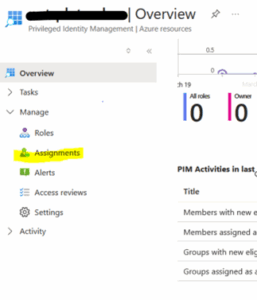
Navigate to PIM (Privileged Identity Management)
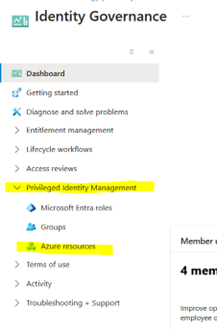
- Step 3: In the Azure portal, navigate to Identity Governance and select Privileged Identity Management (PIM) to manage privileged access.

Enable PIM for Azure Resources
- Step 4: You can select the specific section within PIM you wish to enable PIM for. For this setup, we are focusing on enabling PIM for subscription-level access to control who can activate privileged access for Azure subscriptions.
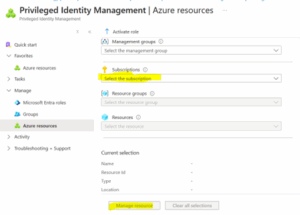
- Step 5: Choose Azure Resources from the list of available options in PIM, as shown in the screenshot below.
-
- An assignment needs to be created for the groups we created so that members of those groups will see an option to activate access for their respective subscriptions.
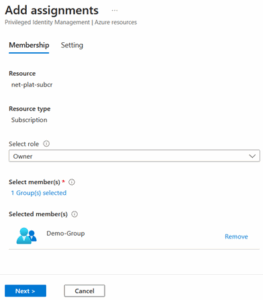
- Step 6: As per the screenshots below, once you select Azure resources, select the subscription and group for which you want to create assignments.
-
- As per the image below, under the Resource section, subscription has been selected for which we want to give permission. Under Resource Type is subscription, choose the role you want to give permission to, and the Demo-Group security group is selected.
- Step 7: Once the assignment is complete, users who are part of a group need to log out and log back in to see the changes applied. To view and activate your assignments in PIM, follow the steps below:
1. Navigate to the Assignments Section
- Go to PIM (Privileged Identity Management) by selecting:
- Entry ID → Identity Governance → PIM → Azure Resources → Activate Role.
2. Select Your Assignment
- In this section, you will see a list of the assignments for which you are eligible.
3. Activate the Role
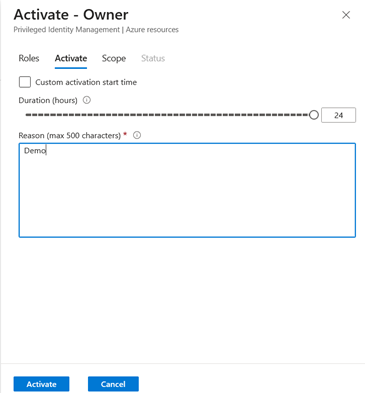
- To activate a role, click on Activate. By default, the assignment will be set for 8 hours. If necessary, you may adjust the duration by justifying the requirement and enabling the assignment.
4. Validation and Finalization
- The system will take some time to validate your request. Once completed, the assignment will appear under the Active Assignments.

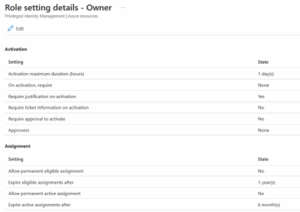
- Step 8: As shown in the screenshot below, the activation duration can be set to 24 hours by editing the assignment settings.
-
- You can modify the assignment settings and adjust the values according to your specific requirements. Please refer to the screenshot below for more details.
Conclusion
Azure PIM helps make your system safer by ensuring that only the right people can access essential resources for a short time. It lets you give access when needed (just-in-time), require approval for special access, automatically manage who can access what, and keep track of everything. PIM is essential for organizations that want to limit who can access sensitive information, ensure only the necessary people have the correct permissions at the right time, and prevent unauthorized access.
Source: Read MoreÂ