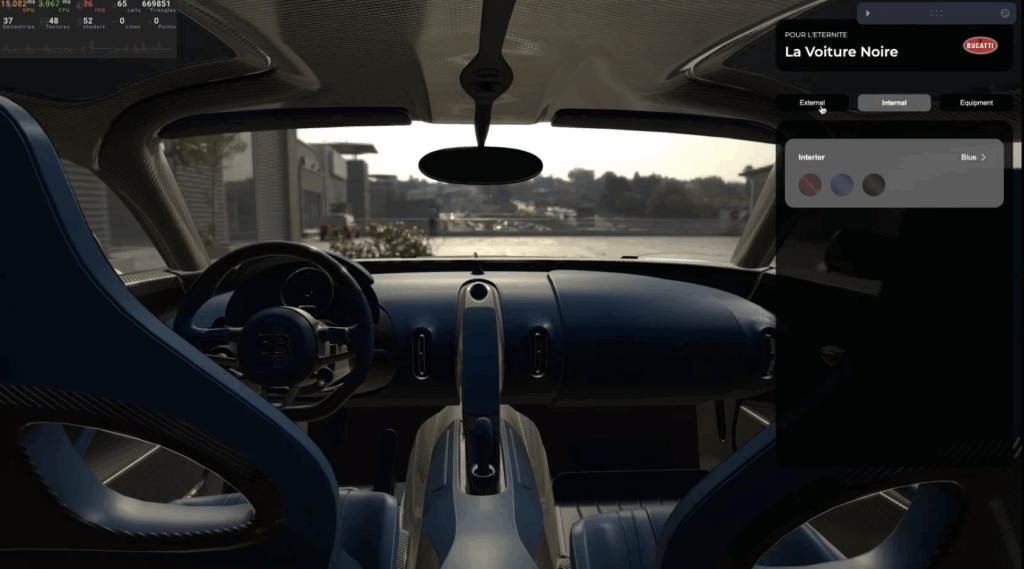
Nowadays, clients and users are more demanding. They want reactive, responsive, and user-friendly web pages where they can interact and “feel” an experience like in the real world. Here is where Three.js comes in, taking web development to the next level.
Three.js
Three.js is a cross-browser JavaScript library and application programming interface (API) agnostic to the framework used, to create and display animated 3D computer graphics in a web browser using WebGL API. But why should we use it if we already have WebGL API? This has an easy answer: complexity. WebGL is a low-level API, which means that basically we need to do almost everything from scratch, light calculation, model loading, vectors, and a lot more, while, on the other hand, Three.js does all this for you.
This is because it is a high-level Api and it abstracts many of these things to make the development easier and developer-friendly, which allows us to focus on what we really need: productivity and quality. It has a wide range of functionalities, including but not limited to Lights, Materials, 3D models, Camera, and Scene,s which are the ones that we used on this practical concept
A Real-Life Use Case
To demonstrate the capabilities of this API, we tried to find a real-life use. After looking into different options, we found that it can be used to improve the car-buying process. Sometimes this process is extensive and difficult to do online. Commonly, a person who makes a car purchase must go directly to the dealership, which sounds okay until a couple of other issues appear: what if there is no dealership in my city? Or even worse, what if the model is not available in my country yet? It makes sense to wait for months just to see if I like the car, color, or interior? Absolutely not.
How the Process was Improved
After looking at improvement areas, our objective turned into finding a way to add value to the final user and, also, to our customers/clients. We researched each role and their needs in this context and found that what the final user really needs is to see their car in its final state before purchasing so then they can take a final decision; and on the client side, they want to make sure the final user is satisfied with the final product by providing a preview of what they’re going to get once the purchase process is finalized.
In the second iteration, the focus changed to a customization experience where the user can, in real time, change car features like color, materials, car kits, interior color, etc. This brought unique design needs, like a new UI focused on customization, a new narrative so the user always knew in which part of the process he was.
A Technical View of Three.js
Materials
Materials are mapped on the 3D model itself, and it can be mapped on different parts, and then we can modify them with ours. This is an example of how we can do that.
First, we load the model:
const { nodes, materials } = useGLTF('/model/2015_bugatti_atlantic_-_concept_car.glb') as GLTFResult;
Then we map the model materials with our own names, which allows us to identify easily which material refers to what in the model:
const mappedMaterials = {
    carpet: materials.Bugatti_AtlanticConcept_2015BadgeA_Material,
    upholstery: materials.Bugatti_AtlanticConcept_2015Carbon1M_Material,
    grill: materials.Bugatti_AtlanticConcept_2015Grille1A_Material,
    zippers: materials.Bugatti_AtlanticConcept_2015Grille2A_Material,
    doorPanel: materials.Bugatti_AtlanticConcept_2015Grille4A_Material,
    carPaint: carPaint,
    grillDoor: materials.Bugatti_AtlanticConcept_2015Grille5A_Material,
    trunk: materials.Bugatti_AtlanticConcept_2015InteriorColourZoneA_Material,
    interior: materials.Bugatti_AtlanticConcept_2015InteriorA_Material,
    lights: materials.Bugatti_AtlanticConcept_2015LightA_Material,
    plate: materials.Bugatti_AtlanticConcept_2015ManufacturerPlateA_Material,
    belt: materials.PaletteMaterial003,
    frontGrill: materials.Bugatti_AtlanticConcept_2015TexturedA_Material,
    rims: materials.Bugatti_AtlanticConcept_2015_Wheel1A_3D_3DWheel1A_Material,
    brakes: materials.Bugatti_AtlanticConcept_2015_CallipersCalliperA_Zone_Material,
    borderWindows: materials.PaletteMaterial006,
    jointsChasis: materials.PaletteMaterial007,
    gloveHandle: materials.Bugatti_AtlanticConcept_2015Grille3A_Material,
};
Finally, we can edit each material as we wish:
mappedMaterials.brakes.color = new THREE.Color(paint.color);
mappedMaterials.rims.color = new THREE.Color(rimsPaint.color);
mappedMaterials.jointsChasis.color = new THREE.Color(rimsPaint.color);
Cameras and Scene
Here we load the place where our 3D models are going to be displayed, which is what we call the Scene.
<Environment
    files="/environment/rooftop_day_2k.hdr"
    ground={{ height, radius, scale }}
    environmentIntensity={0.7}
/>
Here I want to clarify something, we said that Three.js is agnostic to the framework, so maybe you may ask why the scene/environment looks like a React component, this is because we are using a library that makes the implementation easier on React, since our application is made in this framework. This library is called Three Fiber, and we will have the opportunity to talk about it on another blog. However, you need to know that this library now converts Three.js functions into React components to make the development easier and readable.
Then we load the 3D model and our cameras, in this case we have 2 cameras. In a few words, a camera is the point in the screen where the user is going to look into our scene.
<BugattiCarOptimized scale={carScale} rotation-y={rotationY} />
<PerspectiveCamera
    makeDefault={isExternalCamera}
    position={[
       externalPosition.cameraPositionX,
       externalPosition.cameraPositionY,
       externalPosition.cameraPositionZ,
    ]}
    near={cameraNear}
    far={cameraFar}
    rotation={[externalPosition.cameraRotateX, externalPosition.cameraRotateY, externalPosition.cameraRotateZ]}
/>
Finally, we add our Lights. It is important to know that adding lights is a must-have; without them, all we will see is an empty black screen.
<directionalLight position={[5, 10, 12]} intensity={1} castShadow shadow-mapSize={[1024, 1024]} />
We pack all these items into the scene component just like in React, then everything should look like this:
return (
    <>
      <Environment
        files="/environment/rooftop_day_2k.hdr"
        ground={{ height, radius, scale }}
        environmentIntensity={0.7}
      />
      <BugattiCarOptimized scale={carScale} rotation-y={rotationY} />
      <ContactShadows
        renderOrder={2}
        frames={1}
        resolution={1024}
        scale={shadowScale}
        blur={1}
        opacity={0.7}
        near={shadowNear}
        far={shadowFar}
        position={[0.2, 0, -0.05]}
      />
      <PerspectiveCamera
        makeDefault={isExternalCamera}
        position={[
          externalPosition.cameraPositionX,
          externalPosition.cameraPositionY,
          externalPosition.cameraPositionZ,
        ]}
        near={cameraNear}
        far={cameraFar}
        rotation={[externalPosition.cameraRotateX, externalPosition.cameraRotateY, externalPosition.cameraRotateZ]}
      />
      <PerspectiveCamera
        makeDefault={!isExternalCamera}
        position={[
          internalPosition.cameraPositionX,
          internalPosition.cameraPositionY,
          internalPosition.cameraPositionZ,
        ]}
        near={cameraNear}
        far={cameraFar}
        rotation={[internalPosition.cameraRotateX, internalPosition.cameraRotateY, internalPosition.cameraRotateZ]}
      />

      {showEffects && <BaseEffect />}
      {import.meta.env.DEV && (
        <>
          {/*<OrbitControls />*/}
          <Perf position="top-left" />
        </>
      )}
      <directionalLight position={[5, 10, 12]} intensity={1} castShadow shadow-mapSize={[1024, 1024]} />
    </>
  );
That’s the big picture of the general implementation. We didn’t explain some things because the blog would be too long, but I tried to explain the most important things. Now comes the most exciting part.
Next Steps
The user needs to feel in control and not feel overwhelmed by all the different options that exist. Because of that, we want to include an AI agent who, according to some user choices in a form, will create and customize the car to simplify part of the process, giving the final user a base car to start working on, or a final state car that fits the user. After this process, the user will be able to download the customized vehicle or share with the sales team the final 3D model, with its respective quote and purchase summary, this is so that the sales team can get in touch with the user as soon as possible.
Written in collaboration with Miguel Naranjo, Sebastian Corrales ,and Sebastian Castillo.
Source: Read MoreÂ


