In this tutorial, we will be implementing a custom Model Context Protocol (MCP) Client using Gemini. By the end of this tutorial, you will be able to connect your own AI applications with MCP servers, unlocking powerful new capabilities to supercharge your projects.
Step 1: Setting up the dependencies
Gemini API
We’ll be using the Gemini 2.0 Flash model for this tutorial.
To get your Gemini API key, visit Google’s Gemini API Key page and follow the instructions.
Once you have the key, store it safely—you’ll need it later.
Node.js
Some of the MCP servers require Node.js to run. Download the latest version of Node.js from nodejs.org
- Run the installer.
- Leave all settings as default and complete the installation.
National Park Services API
For this tutorial, we will be exposing the National Park Services MCP server to our client. To use the National Park Service API, you can request an API key by visiting this link and filling out a short form. Once submitted, the API key will be sent to your email.
Make sure to keep this key accessible—we’ll be using it shortly.
Installing Python libraries
In the command prompt, enter the following code to install the python libraries:
pip install mcp python-dotenv google-genaiStep 2: Setting up the configuration files
Creating mcp.json file
Next, create a file named mcp.json.
This file will store configuration details about the MCP servers your client will connect to.
Once the file is created, add the following initial content:
{
    "mcpServers": {
      "nationalparks": {
        "command": "npx",
        "args": ["-y", "mcp-server-nationalparks"],
        "env": {
            "NPS_API_KEY": <”YOUR_NPS_API_KEY”>
        }
      }
    }
}
Replace <YOUR_NPS_API_KEY> with the key you generated.
Creating .env file
Create a .env file in the same directory as the mcp.json file and enter the following code:
GEMINI_API_KEY = <YOUR_GEMINI_API_KEY>Replace <YOUR_GEMINI_API_KEY> with the key you generated.
Step 3: Implementing the MCP Client
We will now create a client.py file to implement our MCP Client. Make sure that this file is in the same directory as mcp.json and .env
Basic Client Structure
We will first import the necessary libraries and create a basic client class
import asyncio
import json
import os
from typing import List, Optional
from contextlib import AsyncExitStack
import warnings

from google import genai
from google.genai import types
from mcp import ClientSession, StdioServerParameters
from mcp.client.stdio import stdio_client
from dotenv import load_dotenv

load_dotenv()
warnings.filterwarnings("ignore", category=ResourceWarning)

def clean_schema(schema): # Cleans the schema by keeping only allowed keys
    allowed_keys = {"type", "properties", "required", "description", "title", "default", "enum"}
    return {k: v for k, v in schema.items() if k in allowed_keys}

class MCPGeminiAgent:
    def __init__(self):
        self.session: Optional[ClientSession] = None
        self.exit_stack = AsyncExitStack()
        self.genai_client = genai.Client(api_key=os.getenv("GEMINI_API_KEY"))
        self.model = "gemini-2.0-flash"
        self.tools = None
        self.server_params = None
        self.server_name = None
The __init__ method initializes the MCPGeminiAgent by setting up an asynchronous session manager, loading the Gemini API client, and preparing placeholders for model configuration, tools, and server details.
It lays the foundation for managing server connections and interacting with the Gemini model.
Selecting the MCP Server
async def select_server(self):
        with open('mcp.json', 'r') as f:
            mcp_config = json.load(f)
        servers = mcp_config['mcpServers']
        server_names = list(servers.keys())
        print("Available MCP servers:")
        for idx, name in enumerate(server_names):
            print(f"  {idx+1}. {name}")
        while True:
            try:
                choice = int(input(f"Please select a server by number [1-{len(server_names)}]: "))
                if 1 <= choice <= len(server_names):
                    break
                else:
                    print("That number is not valid. Please try again.")
            except ValueError:
                print("Please enter a valid number.")
        self.server_name = server_names[choice-1]
        server_cfg = servers[self.server_name]
        command = server_cfg['command']
        args = server_cfg.get('args', [])
        env = server_cfg.get('env', None)
        self.server_params = StdioServerParameters(
            command=command,
            args=args,
            env=env
        )
This method prompts the user to choose a server from the available options listed in mcp.json. It loads and prepares the selected server’s connection parameters for later use.
Connecting to the MCP Server
async def connect(self):
        await self.select_server()
        self.stdio_transport = await self.exit_stack.enter_async_context(stdio_client(self.server_params))
        self.stdio, self.write = self.stdio_transport
        self.session = await self.exit_stack.enter_async_context(ClientSession(self.stdio, self.write))
        await self.session.initialize()
        print(f"Successfully connected to: {self.server_name}")
        # List available tools for this server
        mcp_tools = await self.session.list_tools()
        print("nAvailable MCP tools for this server:")
        for tool in mcp_tools.tools:
            print(f"- {tool.name}: {tool.description}")
This establishes an asynchronous connection to the selected MCP server using stdio transport. It initializes the MCP session and retrieves the available tools from the server.
Handling User query and tool calls
async def agent_loop(self, prompt: str) -> str:
        contents = [types.Content(role="user", parts=[types.Part(text=prompt)])]
        mcp_tools = await self.session.list_tools()
        tools = types.Tool(function_declarations=[
            {
                "name": tool.name,
                "description": tool.description,
                "parameters": clean_schema(getattr(tool, "inputSchema", {}))
            }
            for tool in mcp_tools.tools
        ])
        self.tools = tools
        response = await self.genai_client.aio.models.generate_content(
            model=self.model,
            contents=contents,
            config=types.GenerateContentConfig(
                temperature=0,
                tools=[tools],
            ),
        )
        contents.append(response.candidates[0].content)
        turn_count = 0
        max_tool_turns = 5
        while response.function_calls and turn_count < max_tool_turns:
            turn_count += 1
            tool_response_parts: List[types.Part] = []
            for fc_part in response.function_calls:
                tool_name = fc_part.name
                args = fc_part.args or {}
                print(f"Invoking MCP tool '{tool_name}' with arguments: {args}")
                tool_response: dict
                try:
                    tool_result = await self.session.call_tool(tool_name, args)
                    print(f"Tool '{tool_name}' executed.")
                    if tool_result.isError:
                        tool_response = {"error": tool_result.content[0].text}
                    else:
                        tool_response = {"result": tool_result.content[0].text}
                except Exception as e:
                    tool_response = {"error":  f"Tool execution failed: {type(e).__name__}: {e}"}
                tool_response_parts.append(
                    types.Part.from_function_response(
                        name=tool_name, response=tool_response
                    )
                )
            contents.append(types.Content(role="user", parts=tool_response_parts))
            print(f"Added {len(tool_response_parts)} tool response(s) to the conversation.")
            print("Requesting updated response from Gemini...")
            response = await self.genai_client.aio.models.generate_content(
                model=self.model,
                contents=contents,
                config=types.GenerateContentConfig(
                    temperature=1.0,
                    tools=[tools],
                ),
            )
            contents.append(response.candidates[0].content)
        if turn_count >= max_tool_turns and response.function_calls:
            print(f"Stopped after {max_tool_turns} tool calls to avoid infinite loops.")
        print("All tool calls complete. Displaying Gemini's final response.")
        return response
This method sends the user’s prompt to Gemini, processes any tool calls returned by the model, executes the corresponding MCP tools, and iteratively refines the response. It manages multi-turn interactions between Gemini and the server tools.
Interactive Chat Loop
async def chat(self):
        print(f"nMCP-Gemini Assistant is ready and connected to: {self.server_name}")
        print("Enter your question below, or type 'quit' to exit.")
        while True:
            try:
                query = input("nYour query: ").strip()
                if query.lower() == 'quit':
                    print("Session ended. Goodbye!")
                    break
                print(f"Processing your request...")
                res = await self.agent_loop(query)
                print("nGemini's answer:")
                print(res.text)
            except KeyboardInterrupt:
                print("nSession interrupted. Goodbye!")
                break
            except Exception as e:
                print(f"nAn error occurred: {str(e)}")
This provides a command-line interface where users can submit queries and receive answers from Gemini, continuously until they exit the session.
Cleaning up resources
async def cleanup(self):
        await self.exit_stack.aclose()
This closes the asynchronous context and cleans up all open resources like the session and connection stack gracefully.
Main entry point
async def main():
    agent = MCPGeminiAgent()
    try:
        await agent.connect()
        await agent.chat()
    finally:
        await agent.cleanup()

if __name__ == "__main__":
    import sys
    import os
    try:
        asyncio.run(main())
    except KeyboardInterrupt:
        print("Session interrupted. Goodbye!")
    finally:
        sys.stderr = open(os.devnull, "w")
This is the main execution logic.
Apart from main(), all other methods are part of the MCPGeminiAgent class. You can find the complete client.py file here.
Step 4: Running the client
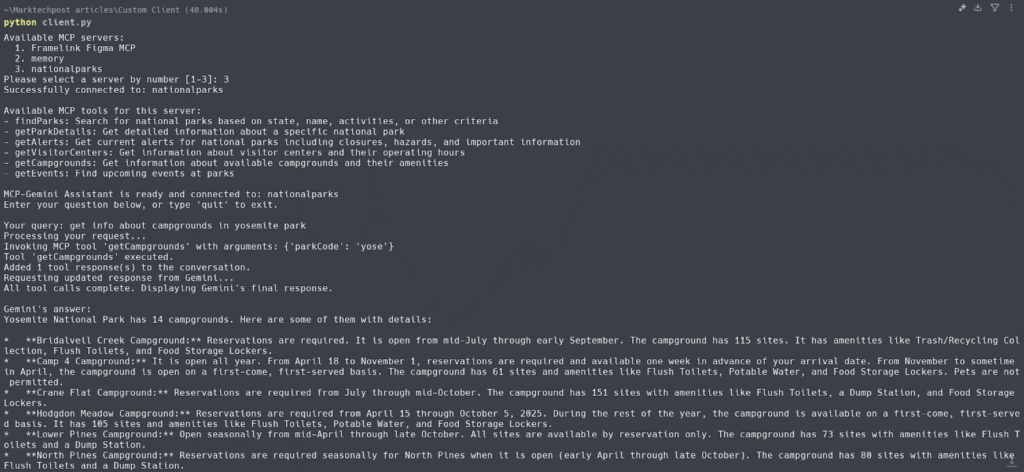
Run the following prompt in the terminal to run your client:
python client.pyThe client will:
- Read the mcp.json file to list the different available MCP servers.
- Prompt the user to select one of the listed servers.
- Connect to the selected MCP server using the provided configuration and environment settings.
- Interact with the Gemini model through a series of queries and responses.
- Allow users to issue prompts, execute tools, and process responses iteratively with the model.
- Provide a command-line interface for users to engage with the system and receive real-time results.
- Ensure proper cleanup of resources after the session ends, closing connections and releasing memory.
The post How to Create a Custom Model Context Protocol (MCP) Client Using Gemini appeared first on MarkTechPost.
Source: Read MoreÂ


