In enterprise environments, organizations often divide their AI operations into two specialized teams: an AI research team and a model hosting team. The research team is dedicated to developing and enhancing AI models using model training and fine-tuning techniques. Meanwhile, a separate hosting team is responsible for deploying these models across their own development, staging, and production environments.
With Amazon Bedrock Custom Model Import, the hosting team can import and serve custom models using supported architectures such as Meta Llama 2, Llama 3, and Mistral using On-Demand pricing. Teams can import models with weights in Hugging Face safetensors format from Amazon SageMaker or from Amazon Simple Storage Service (Amazon S3). These imported custom models work alongside existing Amazon Bedrock foundation models (FMs) through a single, unified API in a serverless manner, alleviating the need to manage model deployment and scaling.
However, in such enterprise environments, these teams often work in separate AWS accounts for security and operational reasons. The model development team’s training results, known as model artifacts, for example model weights, are typically stored in S3 buckets within the research team’s AWS account, but the hosting team needs to access these artifacts from another account to deploy models. This creates a challenge: how do you securely share model artifacts between accounts?
This is where cross-account access becomes important. With Amazon Bedrock Custom Model Import cross-account support, we can help you configure direct access between the S3 buckets storing model artifacts and the hosting account. This streamlines your operational workflow while maintaining security boundaries between teams. One of our customers quotes:
Bedrock Custom Model Import cross-account support helped AI Platform team to simplify the configuration, reduce operational overhead and secure models in the original location.
– Scott Chang, Principal Engineer, AI Platform at Salesforce
In this guide, we walk you through step-by-step instructions for configuring cross-account access for Amazon Bedrock Custom Model Import, covering both non-encrypted and AWS Key Management Service (AWS KMS) based encrypted scenarios.
Example scenario
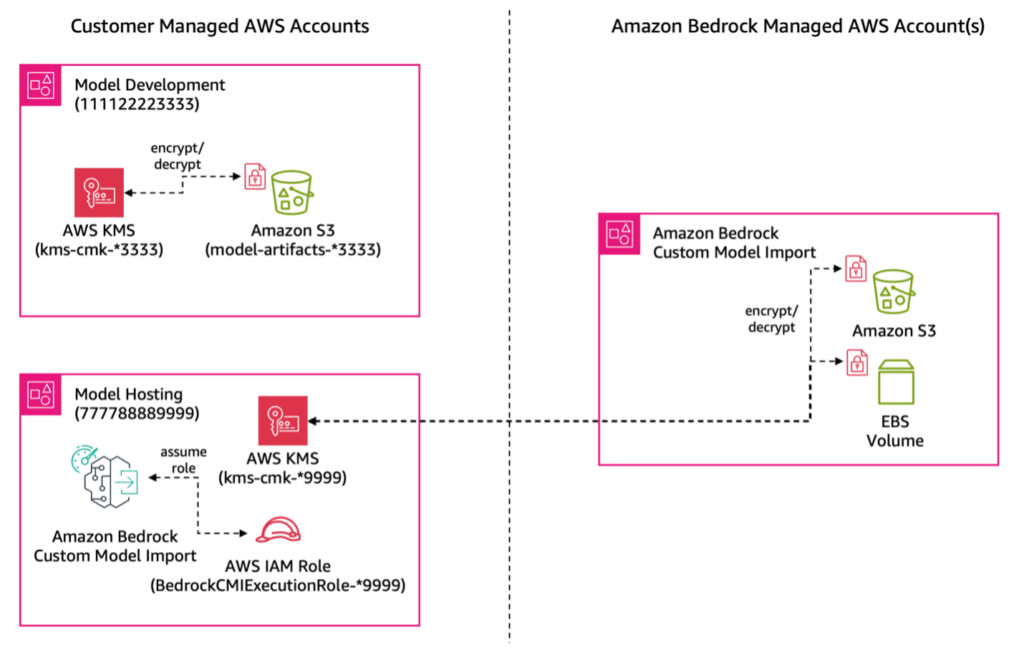
For this walkthrough, consider two AWS accounts:
- Model Development account (
111122223333):- Stores model artifacts (custom weights and configurations) in an S3 bucket called
model-artifacts-111122223333 - Optionally encrypts artifacts using AWS KMS customer managed key
kms-cmk-111122223333
- Stores model artifacts (custom weights and configurations) in an S3 bucket called
- Model Hosting account (
777788889999):- Hosts models using Amazon Bedrock Custom Model Import
- Uses a new AWS Identity and Access Management (IAM) execution role
BedrockCMIExecutionRole-777788889999 - Can optionally encrypt artifacts using AWS KMS key
kms-cmk-777788889999
The following figure illustrates this setup, showing how the cross-account access is configured between the S3 bucket, KMS keys, and Amazon Bedrock Custom Model Import.

To successfully implement the described scenario while adhering to the principle of least privilege access, the following steps must be executed:
- The Model Development account must provide access to the Model Hosting account’s IAM role
BedrockCMIExecutionRole-777788889999, allowing it to utilize their S3 bucket and, if applicable, the encryption key, using resource-based policies. - The Model Hosting account should establish an IAM role, such as
BedrockCMIExecutionRole-777788889999. The identity-based policies needed would be for the Model Development S3 bucket and customer managed keys for decrypting model artifacts, like usingkms-cmk-111122223333. - The Model Hosting account must enable the Amazon Bedrock service to assume the IAM role
BedrockCMIExecutionRole-777788889999, created in step 2, by including the Amazon Bedrock service as a trusted entity. This IAM role will be utilized by the Model Hosting account to initiate the custom model import job.
Prerequisites
Before you can start a custom model import job, you need to fulfill the following prerequisites:
- If you’re importing your model from an S3 bucket, prepare your model files in the Hugging Face weights format. For more information refer to Import source.
- (Optional) Set up extra security configurations.
- You can encrypt input and output data, import jobs, or inference requests made to imported models. For more information refer to Encryption of custom model import.
- You can create a virtual private cloud (VPC) to protect your customization jobs. For more information, refer to (Optional) Protect custom model import jobs using a VPC.
Step-by-step execution
The following section provides the step-by-step execution of the previously outlined high-level process, from the perspective of an administrator managing both accounts:
Step 1: Set up the S3 bucket policy (in the Model Development account) to enable access for the Model Hosting account’s IAM role:
- Sign in to the AWS Management Console for account
111122223333, then access the Amazon S3 console. - On the General purpose buckets view, locate
model-artifacts-111122223333, the bucket used by the model development team to store their model artifacts. - On the Permissions tab, select Edit in the Bucket policy section, and insert the following IAM resource-based policy. Be sure to update the AWS account IDs (shown in red) in the policy with your information.
Step 2: Establish an IAM role (in the Model Hosting account) and authorize Amazon Bedrock to assume this role:
- Sign in to the AWS console for account
777788889999and launch the IAM console. - In the left navigation pane, select Policies and then choose Create policy. Within the Policy Editor, switch to the JSON tab and insert the following identity-based policy. This policy is designed for read-only access, enabling users or a role to list and download objects from a specified S3 bucket, but only if the bucket is owned by account
111122223333. Customize the AWS account ID and S3 bucket name/prefix (shown in red) with your information.
- Choose Next, assign the policy name as
BedrockCMIExecutionPolicy-777788889999, and finalize by choosing Create policy. - In the left navigation pane, choose Roles and select Custom trust policy as the Trusted entity type. Insert the following trusted entity policy, which restricts the role assumption to the Amazon Bedrock service, specifically for model import jobs in account
777788889999located in the US East (N. Virginia)us-east-1Region. Modify the AWS account ID and Region (shown in red) with your information.
- Choose Next and in the Add permissions section, search for the policy created in the previous step
BedrockCMIExecutionPolicy-777788889999, select the checkbox, and proceed by choosing Next. - Assign the Role name as
BedrockCMIExecutionRole-777788889999, provide a Description as “IAM execution role to be used by CMI jobs,” and finalize by choosing Create role.
Important: If you’re using an AWS KMS encryption key for model artifacts in the Model Development account or for imported model artifacts with the Amazon Bedrock managed AWS account, proceed with steps 3 through 5. If not, skip to step 6.
Step 3: Adjust the AWS KMS key policy (in the Model Development account) to allow the Amazon Bedrock CMI execution IAM role to decrypt model artifacts:
- Transition back to the Model Development account and find the AWS KMS key named
kms-cmk-111122223333in the AWS KMS console. Note the AWS KMS key Amazon Resource Name (ARN). - On the Key policy tab, switch to the Policy view, and incorporate the following resource-based policy statement to enable the Model Hosting account’s IAM role
BedrockCMIExecutionRole-777788889999to decrypt model artifacts. Revise items in red with your information.
Step 4: Set the AWS KMS key policy (in the Model Hosting account) for the CMI execution IAM role to encrypt and decrypt model artifacts to securely store in the Amazon Bedrock AWS account:
- Return to the Model Hosting account and locate the AWS KMS key named
kms-cmk-777788889999in the AWS KMS console. Note the AWS KMS key ARN. - Insert the following statement into the AWS KMS key’s resource-based policy to enable the
BedrockCMIExecutionRole-777788889999IAM role to encrypt and decrypt model artifacts at rest in the Amazon Bedrock managed AWS account. Revise items in red with your information.
Step 5: Modify the CMI execution role’s permissions (in the Model Hosting account) to provide access to encryption keys:
Access the IAM console and find the IAM policy BedrockCMIExecutionPolicy-777788889999. To the existing identity-based policy, append the following statements (replace the ARNs in red with one noted in steps 4 and 5):
Step 6: Initiate the Model import job (in the Model Hosting account)
In this step, we execute the model import job using the AWS Command Line Interface (AWS CLI) command. You can also use AWS SDKs or APIs for the same purpose. Run the following command from your terminal session with an IAM user or role that has the necessary privileges to create a custom model import job. You don’t need to explicitly provide an ARN or details of the CMK used by the Model Development team.
When encrypting model artifacts with Amazon Bedrock Custom Model Import, use the --imported-model-kms-key-id flag and specify the ARN of the Model Hosting account’s CMK key.
Cross-account access to the S3 bucket using the custom model import job is only supported through AWS CLI, AWS SDKs, or APIs. Console support is not yet available.
Troubleshooting
When IAM policy misconfigurations prevent a custom model import job, you might encounter an error like:
To resolve this, manually verify access to Model Development’s S3 bucket from the Model Hosting account by assuming the BedrockCMIExecutionRole-777788889999. Follow these steps:
Step 1: Identify the current IAM role or user in the CLI with the following and copy the ARN from the output:
Step 2: Update trust relationships. Append the trust policy of the BedrockCMIExecutionRole-777788889999 to allow the current user or IAM role to assume this role:
Step 3: List or copy the S3 bucket contents assuming the Amazon Bedrock Custom Model Import execution role
- Assume the CMI execution role (replace the ARN with your information):
- Export the returned temporary credentials as environment variables:
- Run commands to troubleshoot permission issues:
If errors persist, consider using Amazon Q Developer or refer to additional resources outlined in the IAM User Guide.
Cleanup
There is no additional charge to import a custom model to Amazon Bedrock (refer to step 6 in the Step-by-step execution section). However, if your model isn’t in use for inference, and you want to avoid paying storage costs (refer to Amazon Bedrock pricing), delete the imported model using the AWS console or AWS CLI reference or API Reference. For example (replace the text in red with your imported model name):
Conclusion
By using cross-account access in Amazon Bedrock Custom Model Import, organizations can significantly streamline their AI model deployment workflows.
Amazon Bedrock Custom Model Import is generally available today in Amazon Bedrock in the US East (N. Virginia) us-east-1 and US West (Oregon) us-west-2 AWS Regions. Refer to the full Region list for future updates. To learn more, refer to the Amazon Bedrock Custom Model Import product page and Amazon Bedrock pricing page. Give Amazon Bedrock Custom Model Import a try in the Amazon Bedrock console today and send feedback to AWS re:Post for Amazon Bedrock or through your usual AWS Support contacts.
Thank you to our contributors Scott Chang (Salesforce), Raghav Tanaji (Salesforce), Rupinder Grewal (AWS), Ishan Singh (AWS), and Dharinee Gupta (AWS)
About the Authors
 Hrushikesh Gangur is a Principal Solutions Architect at AWS. Based in San Francisco, California, Hrushikesh is an expert in AWS machine learning. As a thought leader in the field of generative AI, Hrushikesh has contributed to AWS’s efforts in helping startups and ISVs build and deploy AI applications. His expertise extends to various AWS services, including Amazon SageMaker, Amazon Bedrock, and accelerated computing which are crucial for building AI applications.
 Sai Darahas Akkineni is a Software Development Engineer at AWS. He holds a master’s degree in Computer Engineering from Cornell University, where he worked in the Autonomous Systems Lab with a specialization in computer vision and robot perception. Currently, he helps deploy large language models to optimize throughput and latency.
 Prashant Patel is a Senior Software Development Engineer in AWS. He’s passionate about scaling large language models for enterprise applications. Prior to joining AWS, he worked at IBM on productionizing large-scale AI/ML workloads on Kubernetes. Prashant has a master’s degree from NYU Tandon School of Engineering. While not at work, he enjoys traveling and playing with his dogs.
Source: Read MoreÂ


