Close Menu
    DevStackTipsDevStackTips
    • Home
    • News & Updates
      1. Tech & Work
      2. View All

      Sunshine And March Vibes (2025 Wallpapers Edition)

      June 3, 2025

      The Case For Minimal WordPress Setups: A Contrarian View On Theme Frameworks

      June 3, 2025

      How To Fix Largest Contentful Paint Issues With Subpart Analysis

      June 3, 2025

      How To Prevent WordPress SQL Injection Attacks

      June 3, 2025

      All the WWE 2K25 locker codes that are currently active

      June 3, 2025

      PSA: You don’t need to spend $400+ to upgrade your Xbox Series X|S storage

      June 3, 2025

      UK civil servants saved 24 minutes per day using Microsoft Copilot, saving two weeks each per year according to a new report

      June 3, 2025

      These solid-state fans will revolutionize cooling in our PCs and laptops

      June 3, 2025
    • Development
      1. Algorithms & Data Structures
      2. Artificial Intelligence
      3. Back-End Development
      4. Databases
      5. Front-End Development
      6. Libraries & Frameworks
      7. Machine Learning
      8. Security
      9. Software Engineering
      10. Tools & IDEs
      11. Web Design
      12. Web Development
      13. Web Security
      14. Programming Languages
        • PHP
        • JavaScript
      Featured

      Community News: Latest PECL Releases (06.03.2025)

      June 3, 2025
      Recent

      Community News: Latest PECL Releases (06.03.2025)

      June 3, 2025

      A Comprehensive Guide to Azure Firewall

      June 3, 2025

      Test Job Failures Precisely with Laravel’s assertFailedWith Method

      June 3, 2025
    • Operating Systems
      1. Windows
      2. Linux
      3. macOS
      Featured

      All the WWE 2K25 locker codes that are currently active

      June 3, 2025
      Recent

      All the WWE 2K25 locker codes that are currently active

      June 3, 2025

      PSA: You don’t need to spend $400+ to upgrade your Xbox Series X|S storage

      June 3, 2025

      UK civil servants saved 24 minutes per day using Microsoft Copilot, saving two weeks each per year according to a new report

      June 3, 2025
    • Learning Resources
      • Books
      • Cheatsheets
      • Tutorials & Guides
    Home»Development»How to Implement Spring Expression Language (SpEL) Validator in Spring Boot: A Step-by-Step Guide

    How to Implement Spring Expression Language (SpEL) Validator in Spring Boot: A Step-by-Step Guide

    February 12, 2025

    In this blog post, I will guide you through the process of implementing a Spring Expression Language (SpEL) validator in a Spring Boot application. SpEL is a powerful expression language that supports querying and manipulating an object graph at runtime. By the end of this tutorial, you will have a working example of using SpEL for validation in your Spring Boot application.

    Project Structure
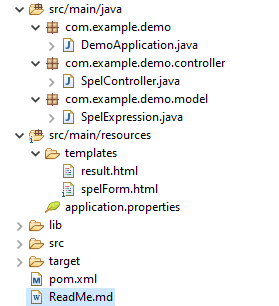

    Project Structure

    Step 1: Set Up Your Spring Boot Project

    First things first, let’s set up your Spring Boot project. Head over to Spring Initializer and create a new project with the following dependencies:

    • Spring Boot Starter Web
    • Thymeleaf (for the form interface)
      <dependencies>
      	<dependency>
      		<groupId>org.springframework.boot</groupId>
      		<artifactId>spring-boot-starter-web</artifactId>
      		<version>3.4.2</version>
      	</dependency>
      	<dependency>
      		<groupId>org.springframework.boot</groupId>
      		<artifactId>spring-boot-starter-thymeleaf</artifactId>
      		<version>3.4.2</version>
      	</dependency>
      </dependencies>
      

    Step 2: Create the Main Application Class

    Next, we will create the main application class to bootstrap our Spring Boot application.

    package com.example.demo;
    
    import org.springframework.boot.SpringApplication;
    import org.springframework.boot.autoconfigure.SpringBootApplication;
    
    @SpringBootApplication
    public class DemoApplication {
    
        public static void main(String[] args) {
            SpringApplication.run(DemoApplication.class, args);
        }
    }

    Step 3: Create a Model Class

    Create a SpelExpression class to hold the user input.

    package com.example.demo.model;
    
    public class SpelExpression {
        private String expression;
    
        // Getters and Setters
        public String getExpression() {
            return expression;
        }
    
        public void setExpression(String expression) {
            this.expression = expression;
        }
    }

    Step 4: Create a Controller

    Create a controller to handle user input and validate the SpEL expression.

    package com.example.demo.controller;
    
    import com.example.demo.model.SpelExpression;
    import org.springframework.expression.ExpressionParser;
    import org.springframework.expression.spel.SpelParseException;
    import org.springframework.expression.spel.standard.SpelExpressionParser;
    import org.springframework.stereotype.Controller;
    import org.springframework.ui.Model;
    import org.springframework.web.bind.annotation.GetMapping;
    import org.springframework.web.bind.annotation.ModelAttribute;
    import org.springframework.web.bind.annotation.PostMapping;
    
    @Controller
    public class SpelController {
    
        private final ExpressionParser parser = new SpelExpressionParser();
    
        @GetMapping("/spelForm")
        public String showForm(Model model) {
            model.addAttribute("spelExpression", new SpelExpression());
            return "spelForm";
        }
    
        @PostMapping("/validateSpel")
        public String validateSpel(@ModelAttribute SpelExpression spelExpression, Model model) {
            try {
                parser.parseExpression(spelExpression.getExpression());
                model.addAttribute("message", "The expression is valid.");
            } catch (SpelParseException e) {
                model.addAttribute("message", "Invalid expression: " + e.getMessage());
            }
            return "result";
        }
    }

    Step 5: Create Thymeleaf Templates

    Create Thymeleaf templates for the form and the result page.

    spelForm.html

    <!DOCTYPE html>
    <html xmlns:th="http://www.thymeleaf.org">
    <head>
        <title>SpEL Form</title>
        <style>
            body {
                font-family: Arial, sans-serif;
                background-color: #f4f4f9;
                color: #333;
                margin: 0;
                padding: 0;
                display: flex;
                justify-content: center;
                align-items: center;
                height: 100vh;
            }
            .container {
                background-color: #fff;
                padding: 20px;
                border-radius: 8px;
                box-shadow: 0 0 10px rgba(0, 0, 0, 0.1);
                text-align: center;
            }
            h1 {
                color: #4CAF50;
            }
            form {
                margin-top: 20px;
            }
            label {
                display: block;
                margin-bottom: 8px;
                font-weight: bold;
            }
            input[type="text"] {
                width: 100%;
                padding: 8px;
                margin-bottom: 20px;
                border: 1px solid #ccc;
                border-radius: 4px;
            }
            button {
                padding: 10px 20px;
                background-color: #4CAF50;
                color: #fff;
                border: none;
                border-radius: 4px;
                cursor: pointer;
            }
            button:hover {
                background-color: #45a049;
            }
        </style>
    </head>
    <body>
        <div class="container">
            <h1>SpEL Expression Validator</h1>
            <form th:action="@{/validateSpel}" th:object="${spelExpression}" method="post">
                <div>
                    <label>Expression:</label>
                    <input type="text" th:field="*{expression}" />
                </div>
                <div>
                    <button type="submit">Validate</button>
                </div>
            </form>
        </div>
    </body>
    </html>

    result.html

    <!DOCTYPE html>
    <html xmlns:th="http://www.thymeleaf.org">
    <head>
        <title>Validation Result</title>
        <style>
            body {
                font-family: Arial, sans-serif;
                background-color: #f4f4f9;
                color: #333;
                margin: 0;
                padding: 0;
                display: flex;
                justify-content: center;
                align-items: center;
                height: 100vh;
            }
            .container {
                background-color: #fff;
                padding: 20px;
                border-radius: 8px;
                box-shadow: 0 0 10px rgba(0, 0, 0, 0.1);
                text-align: center;
            }
            h1 {
                color: #4CAF50;
            }
            p {
                font-size: 18px;
            }
            a {
                display: inline-block;
                margin-top: 20px;
                padding: 10px 20px;
                background-color: #4CAF50;
                color: #fff;
                text-decoration: none;
                border-radius: 4px;
            }
            a:hover {
                background-color: #45a049;
            }
        </style>
    </head>
    <body>
        <div class="container">
            <h1>Validation Result</h1>
            <p th:text="${message}"></p>
            <a href="/spelForm">Back to Form</a>
        </div>
    </body>
    </html>

    Step 6: Run the Application

    Now, it’s time to run your Spring Boot application. To test the SpEL validator, navigate to http://localhost:8080/spelForm in your browser.

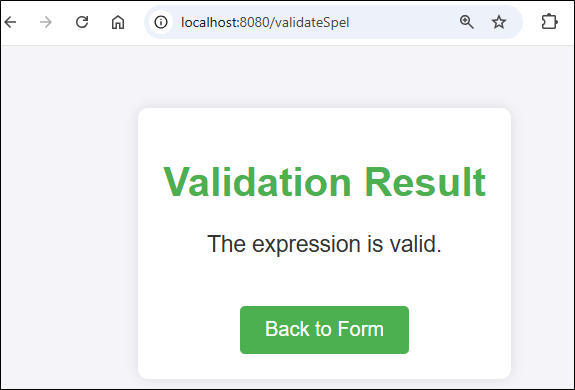
    For Valid Expression
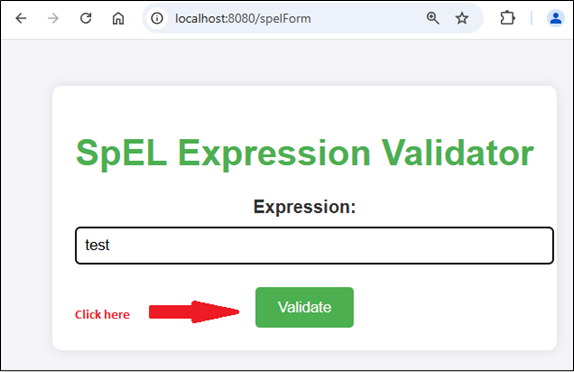
    Expression Validator

    Expression Validator Result

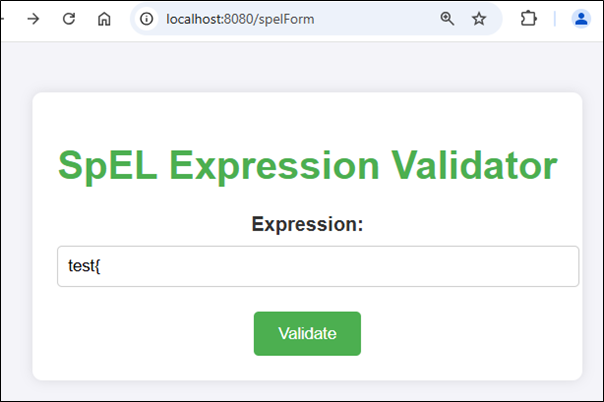
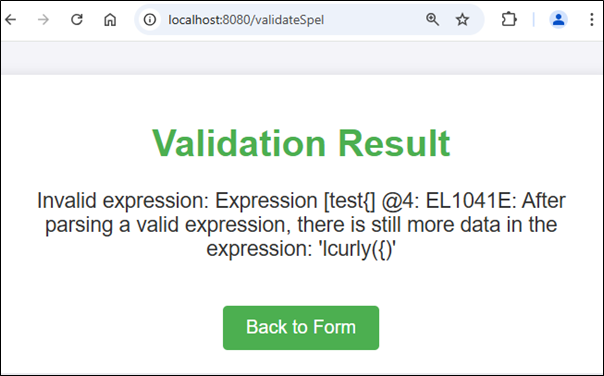
    For Invalid Expression

    Expression Validator

    Expression Validator Result
    Conclusion

    Following this guide, you successfully implemented a SpEL validator in your Spring Boot application. This powerful feature enhances your application’s flexibility and robustness. Keep exploring SpEL for more dynamic and sophisticated solutions. Happy coding!

    Source: Read More 

    Hostinger
    Facebook Twitter Reddit Email Copy Link
    Previous ArticleFixing Focus Visibility Issues for ADA Compliance and Discovering PowerMapper Testing Tool
    Next Article Flutter vs. React Native – Which is Better for Your Project?

    Related Posts

    Security

    BitoPro Silent on $11.5M Hack: Investigator Uncovers Massive Crypto Theft

    June 3, 2025
    Security

    New Linux Vulnerabilities

    June 3, 2025
    Leave A Reply Cancel Reply

    Continue Reading

    Unable to locate button via Selenium WebDriver

    Development

    The next chapter of our Gemini era

    Artificial Intelligence

    April report 2025

    Development

    Server-side Rescoring of Spoken Entity-centric Knowledge Queries for Virtual Assistants

    Development
    Hostinger

    Highlights

    News & Updates

    Microsoft will slow down this version of OneNote before finally terminating support later this year

    March 24, 2025

    Microsoft will throttle OneNote for Windows 10’s sync speed in June before fully shutting down…

    CVE-2025-43844 – Apache Retrieval-Based Voice Conversion WebUI Command Injection Vulnerability

    May 5, 2025

    CSSWG Minutes Telecon (2024-08-21)

    August 30, 2024

    Diablo 4 is collaborating with Berserk, bringing Kentaro Miura’s legendary manga series to the world of Sanctuary

    April 17, 2025
    © DevStackTips 2025. All rights reserved.
    • Contact
    • Privacy Policy

    Type above and press Enter to search. Press Esc to cancel.