Close Menu
    DevStackTipsDevStackTips
    • Home
    • News & Updates
      1. Tech & Work
      2. View All

      The Case For Minimal WordPress Setups: A Contrarian View On Theme Frameworks

      June 4, 2025

      How To Fix Largest Contentful Paint Issues With Subpart Analysis

      June 4, 2025

      How To Prevent WordPress SQL Injection Attacks

      June 4, 2025

      Smashing Animations Part 4: Optimising SVGs

      June 4, 2025

      I test AI tools for a living. Here are 3 image generators I actually use and how

      June 4, 2025

      The world’s smallest 65W USB-C charger is my latest travel essential

      June 4, 2025

      This Spotlight alternative for Mac is my secret weapon for AI-powered search

      June 4, 2025

      Tech prophet Mary Meeker just dropped a massive report on AI trends – here’s your TL;DR

      June 4, 2025
    • Development
      1. Algorithms & Data Structures
      2. Artificial Intelligence
      3. Back-End Development
      4. Databases
      5. Front-End Development
      6. Libraries & Frameworks
      7. Machine Learning
      8. Security
      9. Software Engineering
      10. Tools & IDEs
      11. Web Design
      12. Web Development
      13. Web Security
      14. Programming Languages
        • PHP
        • JavaScript
      Featured

      Beyond AEM: How Adobe Sensei Powers the Full Enterprise Experience

      June 4, 2025
      Recent

      Beyond AEM: How Adobe Sensei Powers the Full Enterprise Experience

      June 4, 2025

      Simplify Negative Relation Queries with Laravel’s whereDoesntHaveRelation Methods

      June 4, 2025

      Cast Model Properties to a Uri Instance in 12.17

      June 4, 2025
    • Operating Systems
      1. Windows
      2. Linux
      3. macOS
      Featured

      My Favorite Obsidian Plugins and Their Hidden Settings

      June 4, 2025
      Recent

      My Favorite Obsidian Plugins and Their Hidden Settings

      June 4, 2025

      Rilasciata /e/OS 3.0: Nuova Vita per Android Senza Google, Più Privacy e Controllo per l’Utente

      June 4, 2025

      Rilasciata Oracle Linux 9.6: Scopri le Novità e i Miglioramenti nella Sicurezza e nelle Prestazioni

      June 4, 2025
    • Learning Resources
      • Books
      • Cheatsheets
      • Tutorials & Guides
    Home»Development»How to update the Data using Laravel 11

    How to update the Data using Laravel 11

    February 10, 2025

    In the previous tutorial, we learnt how to fetch/read data from a database using Laravel 11. The tutorial is about, How to update the data in a database using Laravel 11. To update data in Laravel 11, follow these steps:

    Files created for this tutorial

    fetchController.php (app/Http/Controllers/fetchController.php)

    fetch.blade.php (resources/views/fetch.blade.php)

    update.blade.php (resources/views/update.blade.php)

    updateController.php (app/Http/Controllers/updateController.php)

    web.php (routes/web.php)

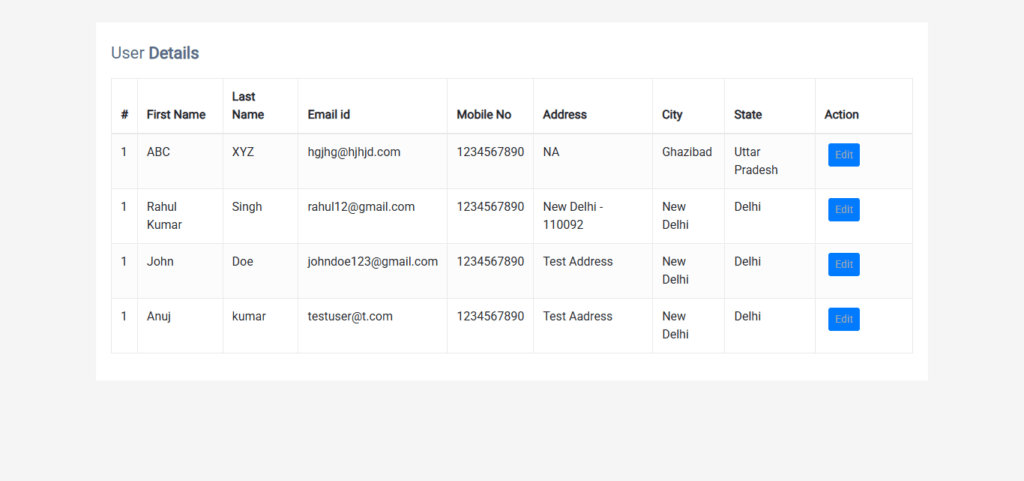
    The User Data looks like before the update.

    Laravel fetch data

    Step 1: Create Controller

    fetchController.php (app/Http/Controllers/fetchController.php)

    The above controller was already created in the previous tutorial.

    Step 2:  Create the Fetch View

    Create a Blade template at resources/views/posts/fetch.blade.php :

    @if(session('success'))
                <div class="alert alert-success">{{ session('success') }}</div>
            @endif
    
            @if(session('error'))
            <div class="alert alert-danger">{{ session('error') }}</div>
            @endif
                <table class="table table-striped table-hover table-bordered">
                    <thead>
                        <tr>
                            <th>#</th>
                            <th>First Name</th>
                            <th>Last Name</th>
                            <th>Email id</th>
                            <th>Mobile No</th>
                            <th>Address</th>
                            <th>City</th>
                            <th>State</th>
                            <th>Action</th>
                        </tr>
                    </thead>
                    <tbody>
                        @foreach ($data as $id => $user )
                        <tr>
                            <td>1</td>
                            <td>{{ $user->firstName }}</td>
                            <td>{{ $user->lastName }}</td>
                            <td>{{ $user->emailId }}</td>
                            <td>{{ $user->mobileNumber }}</td>
                            <td>{{ $user->address }}</td>
                            <td>{{ $user->city }}</td>
                            <td>{{ $user->state }}</td>
                            <td>    <a class="btn btn-primary btn-sm" href="{{ route('update', $user->id) }}">Edit</a></td>
                        </tr>
                        @endforeach
                          
                    </tbody>
                </table>

    Step 3: Create the Edit View

    update.blade.php (resources/views/update.blade.php)

    <form method="post" action="{{ route('updateUser', ['id' => $user->id]) }}">
                  @csrf
            
                  <div class="row g-3">
                    <div class="col-md-6">
                      <label for="your-name" class="form-label">First Name</label>
                      <input type="text" class="form-control" id="firstName" name="firstName"  value="{{ $user->firstName }}">
                      <span class="text-danger">
                      @error('firstName')
                      {{ $message }}
                      @enderror
                      </span>
                    </div>
                
                    <div class="col-md-6">
                      <label for="your-surname" class="form-label">Last Name</label>
                      <input type="text" class="form-control" id="lastName" name="lastName"  value="{{ $user->lastName }}">
                      <span class="text-danger">
                        @error('lastName')
                        {{ $message }}
                        @enderror
                        </span>
                    </div>
                    <div class="col-md-6">
                      <label for="your-email" class="form-label"> Email ID</label>
                      <input type="email" class="form-control" id="emailId" name="emailId"  value="{{ $user->emailId }}">
                      <span class="text-danger">
                        @error('emailId')
                        {{ $message }}
                        @enderror
                        </span>
                    </div>
                    <div class="col-md-6">
                      <label for="your-subject" class="form-label">Mobile No</label>
                      <input type="text" class="form-control" id="mobileNumber" name="mobileNumber"  value="{{ $user->mobileNumber }}">
                      <span class="text-danger">
                        @error('mobileNumber')
                        {{ $message }}
                        @enderror
                        </span>
                    </div>
                    <div class="col-12">
                      <label for="your-message" class="form-label">Address</label>
                      <textarea class="form-control" id="address" name="address" rows="5" >{{ $user->address }}</textarea>
                      <span class="text-danger">
                        @error('address')
                        {{ $message }}
                        @enderror
                        </span>
                    </div>
                    <div class="col-md-6">
                        <label for="your-email" class="form-label"> City</label>
                        <input type="text" class="form-control" id="city" name="city"  value="{{ $user->city }}">
                        <span class="text-danger">
                          @error('city')
                          {{ $message }}
                          @enderror
                          </span>
                      </div>
                      <div class="col-md-6">
                        <label for="your-subject" class="form-label">State</label>
                        <input type="text" class="form-control" id="state" name="state"  value="{{ $user->state }}">
                        <span class="text-danger">
                          @error('state')
                          {{ $message }}
                          @enderror
                          </span>
                      </div>
    
    
                    <div class="col-12">
                      <div class="row">
                        <div class="col-md-6">
                          <button type="submit" class="btn btn-dark w-100 fw-bold" name="submit" >Update</button>
                        </div>
                      </div>

    Step 4: Create Controller

    Hostinger
    php artisan make:controller updateController

    updateController.php (app/Http/Controllers/updateController.php)

    <?php
    namespace AppHttpControllers;
    use IlluminateSupportFacadesDB;
    use IlluminateHttpRequest;
    
    class updateController extends Controller
    {
    
        // Show Particular user
        public function showUser(string $id){
            $user=DB::table('tblusers')->find($id);
            return view('update',['user' => $user]);
        }
    
    // Update a particular record
    public function updateUser(Request $request, $id){
        // return $request;
         $user=DB::table('tblusers')
         ->where('id', $id)
         ->update([
            'firstName' => $request->firstName,
            'lastName' => $request->lastName,
            'emailId' => $request->emailId,
            'mobileNumber' => $request->mobileNumber,
            'address' => $request->address,
            'state' => $request->state,
            'city' => $request->city
     
         ]);
         if($user){
             return redirect()->route('fetch')->with('success', 'Data updated successfully.');
         } else{
            return redirect()->route('fetch')->with('error', 'No changes made');
         }
        }
    
    }

    Step 5: Define Routes

    <?php
    use IlluminateSupportFacadesRoute;
    use AppHttpControllersinsertController;
    use AppHttpControllersfetchController;
    
    // For Form View
    Route::get('/', function () {
        return view('form');
    })->name('form');
    
    // For Insert Data
    Route::post('/insertdata',[insertController::class,'insertdata'])->name('insertdata');
    //For Fetch/Read Data
    Route::get('/fetch',[fetchController::class,'showData'])->name('fetch');
    // For Feth particualr user record
    Route::get('/update/{id}',[updateController::class,'showUser'])->name('update');
    // For Update the particualr user record
    Route::post('/updateUser/{id}',[updateController::class,'updateUser'])->name('updateUser');

    How to run the Script

    1. Download the project zip file

    2. Extract the file and copy insert-app  folder

    3. Paste inside root directory (for xampp xampp/htdocs, for wamp wamp/www, for lamp var/www/Html)

    4.Open PHPMyAdmin (http://localhost/phpmyadmin)

    5. Create a database with the name  userdb

    6. Import userdb.sql file(given inside the zip package in SQL file folder)

    7. Run these command

    PS C :> cd xampp/htdocs/insert-app

    PS C:xampphtdocsinsert-app> php artisan serve

    8. After that open the browser run the script

    http://127.0.0.1:8000/fetch

    Download Full source code(Update/Edit Data Using Laravel11)
    Size: 27.5 MB
    Version: V 1.0
    Download Now!

    The post How to update the Data using Laravel 11 appeared first on PHPGurukul.

    Source: Read More 

    Facebook Twitter Reddit Email Copy Link
    Previous ArticleMicrosoft still hasn’t fixed the KB5044284 bug in Windows 11, even though it said it was resolved
    Next Article How to fetch / read data into MySQL database using Laravel 11

    Related Posts

    Security

    HPE StoreOnce Faces Critical CVE-2025-37093 Vulnerability — Urges Immediate Patch Upgrade

    June 4, 2025
    Security

    CISA Adds Qualcomm Vulnerabilities to KEV Catalog

    June 4, 2025
    Leave A Reply Cancel Reply

    Continue Reading

    CVE-2025-30193 – DNSdist TCP Stack Exhaustion Denial of Service Vulnerability

    Common Vulnerabilities and Exposures (CVEs)

    Facing our Interfaces

    Development

    Windows 11 is getting AI Actions in File Explorer — here’s how to try them right now

    News & Updates

    NZXT Lift Elite mouse review: A new hero has entered the competitive gamer market

    News & Updates

    Highlights

    Development

    How to Check the Number of Dynamic Dashboards in Salesforce?

    March 28, 2025

    Hello Trailblazers! Salesforce dashboards are powerful tools for data visualization and analysis. Among them, dynamic…

    CVE-2025-32922 – Tobias WP2LEADS CSRF Stored XSS

    May 15, 2025

    Windows 11 Integrates Model Context Protocol to Power AI Agents with Enhanced Security

    May 21, 2025

    Top 10 Explainable AI (XAI) Frameworks

    April 25, 2024
    © DevStackTips 2025. All rights reserved.
    • Contact
    • Privacy Policy

    Type above and press Enter to search. Press Esc to cancel.