In this blog, we’ll explore the importance of components, how to create them, and best practices for building modular, reusable UIs.
Why Vue Components Are Essential for Building Scalable UIs
Components are a core feature of Vue.js, known for its simplicity and flexibility. They serve as the building blocks of Vue applications, enabling developers to break down the user interface into smaller, self-contained units. This modular approach makes the code more organized, reusable, and straightforward.
- Think of components as individual pieces of a puzzle.
- Each one can be developed, tested, and maintained independently, and when combined, they create a fully functional application.
- Whether it’s a button, a form, or a complex data table, components let you design modular UI elements that are easy to update.
What Are Vue Components?
In Vue, a component is a self-contained unit of functionality that includes a template, script, and optional styling. Components help modularize the UI, making it easier to reuse parts of the interface across different application parts.
Here’s an example of a Vue component for a simple button
//MyButton.vue
<template>
<button @click="handleClick">{{ label }}</button>
</template>

<script>
export default {
data() {
return {
label: 'Click Me'
};
},
methods: {
handleClick() {
alert('Button Clicked!');
}
}
};
</script>

<style scoped>
button {
padding: 10px 20px;
font-size: 16px;
cursor: pointer;
}
</style>
Breaking Down the Code
- Template: Defines the HTML structure of the component. In this case, it’s a simple button that displays the label.
- Script: Contains the logic, such as the data() function (for reactive properties) and the handleClick method (for the button’s behavior).
- Style: Scoped styling ensures the button’s styles are isolated to this component and won’t affect others in the app. This simple example demonstrates how components work as isolated units in Vue. However, as your app grows, organizing and managing components becomes crucial.
Why Use Components in Vue?
Vue components provide several advantages that contribute to building robust, maintainable, and scalable applications:
- Reusability: Once defined, components can be used across multiple pages or sections of your app, reducing code duplication.
- Modularity: Since components are isolated, you can change one without worrying about breaking other application parts.
- Scalability: Start with small, focused components and quickly expand them into larger, more complex UIs as your application grows.
Advanced Component Features
Once you’re comfortable with basic components, Vue offers advanced features that make your components even more powerful:
Slots: The <slot></slot> tag in Vue lets you define placeholders within components that can accept dynamic content from parent components.
Example of a slot
<!-- Modal.vue -->
<template>
<div class="modal">
<div class="modal-content">
<slot></slot> <!-- Content inserted here will be rendered in the modal -->
</div>
</div>
</template>
Usage in a parent component
<Modal>
<h2>This is a Modal Title</h2>
<p>This content will go inside the modal.</p>
</Modal>
Dynamic Components: You can dynamically swap between different components using Vue’s component element and the: is an attribute is particularly useful for building tabbed interfaces or content that change based on user interaction.
Example of dynamically switching between components
Let’s walk through an example where we dynamically switch between different components using Vue’s component element and the :is attribute. In this example, we’ll create a button that lets you dynamically switch between different components.
Step-by-Step Example
Create components (e.g., ComponentA, ComponentB, ComponentC) to switch between. Next, build the MyButton component to manage dynamic component switching using the ‘:is’ attribute.
1. Create the Components (ComponentA, ComponentB, ComponentC)
Let’s define a few simple components to switch between.
<!-- ComponentA.vue -->
<template>
<div>
<h3>This is Component A</h3>
<p>Content for Component A.</p>
</div>
</template>

<script>
export default {
name: 'ComponentA',
};
</script>
<!-- ComponentB.vue -->
<template>
<div>
<h3>This is Component B</h3>
<p>Content for Component B.</p>
</div>
</template>

<script>
export default {
name: 'ComponentB',
};
</script>
<!-- ComponentC.vue -->
<template>
<div>
<h3>This is Component C</h3>
<p>Content for Component C.</p>
</div>
</template>

<script>
export default {
name: 'ComponentC',
};
</script>
2. Create the MyButton Component
Now, let’s create the MyButton component that will dynamically switch between ComponentA, ComponentB, and ComponentC using the: is attribute.
<!-- MyButton.vue -->
<template>
<div>
<!-- Button to change the current component -->
<button @click="changeComponent('ComponentA')">Show Component A</button>
<button @click="changeComponent('ComponentB')">Show Component B</button>
<button @click="changeComponent('ComponentC')">Show Component C</button>

<!-- Dynamic component rendering -->
<component :is="currentComponent"></component>
</div>
</template>

<script>
import ComponentA from './ComponentA.vue';
import ComponentB from './ComponentB.vue';
import ComponentC from './ComponentC.vue';

export default {
name: 'MyButton',
components: {
ComponentA,
ComponentB,
ComponentC,
},
data() {
return {
currentComponent: 'ComponentA', // Default component to show
};
},
methods: {
changeComponent(componentName) {
this.currentComponent = componentName; // Update the current component based on button clicked
},
},
};
</script>

<style scoped>
button {
margin: 10px;
padding: 8px 12px;
background-color: #007bff;
color: white;
border: none;
cursor: pointer;
}

button:hover {
background-color: #0056b3;
}
</style>
3. Parent Component (App.vue)
Finally, let’s bring everything together in the App.vue file, where we will use MyButton to handle the dynamic component switching.
<!-- App.vue -->
<template>
<div id="app">
<h1>Dynamic Component Switcher</h1>
<MyButton />
</div>
</template>

<script>
import MyButton from './components/MyButton.vue';

export default {
name: 'App',
components: {
MyButton,
},
};
</script>

<style>
#app {
font-family: Avenir, Helvetica, Arial, sans-serif;
text-align: center;
padding: 50px;
}

h1 {
font-size: 2em;
}
</style>
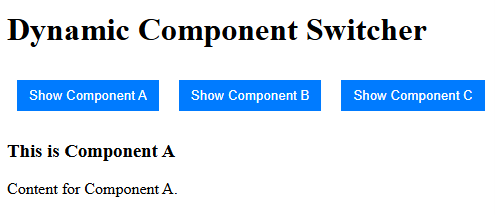
Output:

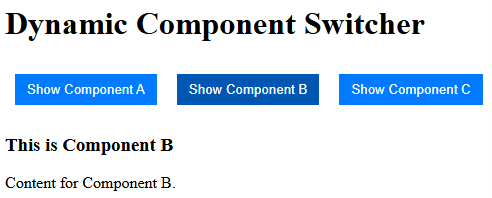
After switching from ComponentA to ComponentB

How It Works:
- Dynamic Component Rendering: In the MyButton.vue file, there’s a special line of code <component :is=â€currentComponentâ€></component> that shows a different component based on the value of currentComponent. Initially, currentComponent is set to ‘ComponentA’, so ComponentA will be shown.
- Buttons: There are three buttons in the MyButton component. When you click one of them, it calls the changeComponent() method, which updates the currentComponent value to the name of the component you clicked (either ComponentA, ComponentB, or ComponentC). This change automatically updates the displayed component.So, the button clicks switch between different components on the screen.
Results
When you run the app
- The initial view will show Component A.
- Clicking on the buttons will dynamically switch to Component B or Component C based on the button clicked.
Summary: This setup uses Vue’s <component :is=â€â€¦â€> element to dynamically swap between different components, which is particularly useful for building interactive interfaces like tabbed views or conditional content displays based on user actions.
Best Practices for Organizing Vue Components
As your Vue application grows, organizing your components efficiently is essential. Here are a few tips to help you keep everything neat and maintainable:
- Atomic Design: Divide your UI into smaller, reusable components. Start with atomic components like buttons and inputs and then combine them into larger structures like forms and navigation bars.
- Folder Structure: To keep your project organized, group components by functionality or UI sections. For example, you might have folders like /components/buttons, /components/forms, and /components/layouts.
- Naming Conventions: Give components meaningful names that describe their purpose. This will help you (and your team) understand what each component does at a glance.
Optimizing Performance with Vue Components
Vue allows you to improve performance when working with components:
- Lazy Loading: You can use dynamic `import()` to load components only when needed, which helps reduce the initial bundle size and improves page load times.
- v-if vs. v-show: Use v-if for conditionally rendering components only when necessary. This prevents unnecessary rendering and can improve performance.
Conclusion
Vue.js components are powerful for building clean, maintainable, and scalable user interfaces. By breaking your app into smaller, reusable parts, you can improve both development efficiency and the long-term maintainability of your project. Whether working on simple UI elements or building complex applications, mastering Vue components will set you on the path to success.
Start creating your Vue.js components today, and watch your application grow modularly with each new feature!
Source: Read MoreÂ


