


Getting started with a new technology can be daunting, but we’re going to break down speech-to-text transcription with node.js to make it easier!
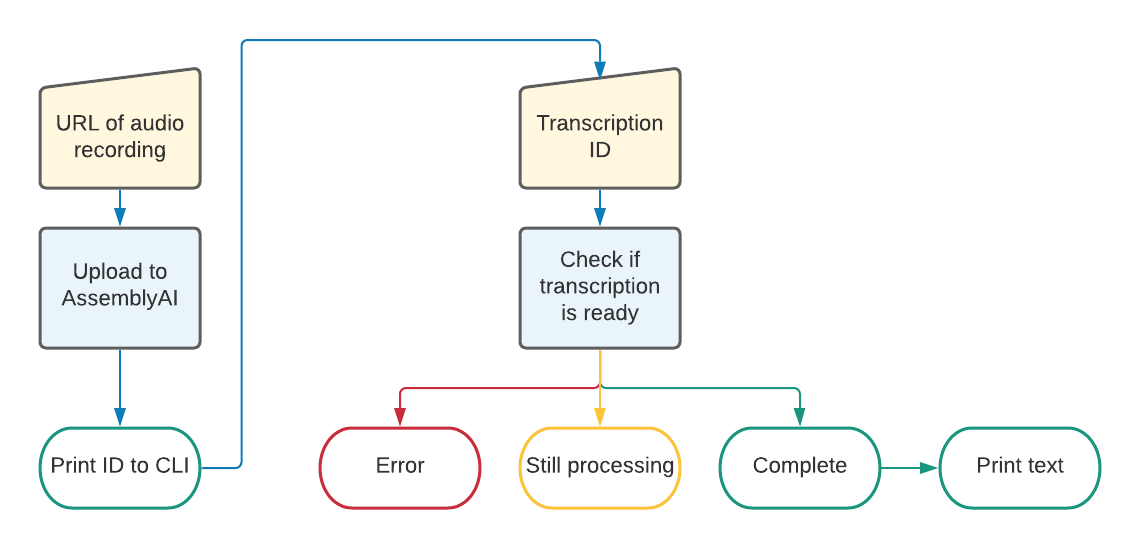
In this post, we will make a basic node.js command-line interface app (often abbreviated to CLI app). We will first pass a URL of an audio recording as an argument to an upload function. This second function will send an HTTP request to the AssemblyAI speech-to-text transcription API.
â€
Then, we’ll print the response from AssemblyAI on the command-line as well as the ID of our transcription. Next, we’ll pass the transcription ID as an argument to a second function that will go and fetch our transcription and print it to the screen!
Prerequisites
- A free AssemblyAI account
- A code editor such as VS Code
- â€Node.js and npm
If you would like to see the completed code project, it is available at this GitHub repository.
Getting your development environment setup
Create a new directory on your computer using your favourite command-line program, such as Terminal or Powershell. I’ve called my directory transcribe. Navigate into it and initialise a new Node.js project:
mkdir transcribe
cd transcribe
npm init -y
Create three new files inside your new transcribe directory:
â€If using Windows:
New-Item upload.js, download.js, .envAnd if using macOS or Linux:
touch upload.js && touch download.js && touch .envIf you don’t already have it installed, we will need the node package dotenv to manage our AssemblyAI API key. You can install it with the following command:
npm i dotenv --saveWe will also use the Fetch API to make our REST call, so make sure to install that too:
npm i node-fetch --saveOpen the .env file in your code editor and add an environment variable to store your AssemblyAI API Key. You can find your API key in the AssemblyAI dashboard and add it as the value to the above variable.
ASSEMBLYAI_API_KEY = "YOUR_API_KEY"Uploading an audio file to the AssemblyAI Transcription API
Before starting, add "type": "module" to your package.json file. This will allow you to use ES Modules, which we will require for this project.
Open the upload.js that we created earlier in your code editor. Copy and paste the following code into this file:
import 'dotenv/config';
import fetch from 'node-fetch';
const url = 'https://api.assemblyai.com/v2/transcript';
The above code will import the two packages that we added earlier, dotenv and fetch. We also define the AssemblyAI API endpoint as url.
We will need to pass the hosted audio file URL as a command-line argument when we run the application. The following code to take that CLI argument and assign it to a variable called audioUrl.
let args = process.argv.slice(2);
let audioUrl = args[0];
If you would like to upload a file from your computer instead, this blog will take take you through the steps.
AssemblyAI is expecting an HTTP POST request with a JSON body. The JSON will contain the audio URL we passed as an argument. So let’s define that next.
const data = {
    "audio_url" : audioUrl
};
Now it’s time to think about our HTTP request.
We are using fetch via the package node-fetch. This module brings the window.fetch from a browser to our Node application.
fetch needs some parameters, including our AssemblyAI API key, JSON body, and Headers. We will make a JavaScript object called params to contain these parameters.
const params = {
    headers:{
        "authorization": process.env.ASSEMBLYAI_API_KEY,
        "content-type": "application/json",
    },
    body: JSON.stringify(data),
    method: "POST"
};
The last step of our upload function is to make the HTTP request and print the response to the command-line.
fetch(url, params)
  .then(response => response.json())
  .then(data => {
    console.log('Success:', data);
    console.log('ID:', data['id']);
  })
  .catch((error) => {
    console.error('Error:', error);
  });
fetch supports promises, so we will make the request and use the then keyword to extract the returned data from the response, displaying both the full JSON response and the transcription ID to the command-line. We will use the catch keyword to display an error in the case that something went wrong.
The entire upload.js file should look like this:
import 'dotenv/config';
import fetch from 'node-fetch';

const url = 'https://api.assemblyai.com/v2/transcript';

let args = process.argv.slice(2);
let audioUrl = args[0];
const data = {
  "audio_url": audioUrl
};

const params = {
  headers: {
    "authorization": process.env.ASSEMBLYAI_API_KEY,
    "content-type": "application/json",
  },
  body: JSON.stringify(data),
  method: "POST"
};

fetch(url, params)
  .then(response => response.json())
  .then(data => {
    console.log('Success:', data);
    console.log('ID:', data['id']);
  })
  .catch((error) => {
    console.error('Error:', error);
  });
Trying it out
From the command-line, type the following (remember you need to be in the same directory as your code files). You can use the URL provided below or one of your choosing, just make sure you can play it in a browser first.
node upload.js https://s3-us-west-2.amazonaws.com/blog.assemblyai.com/audio/8-7-2018-post/7510.mp3
If all went well, you should see the entire returned JSON object from AssemblyAI printed to the screen. This will also include the transcription ID printed in isolation at the end.
Download a transcription from AssemblyAI
In this application, we will make a request to the AssemblyAI endpoint to check if our transcript is completed.
AssemblyAI also supports webhooks, which means AssemblyAI will make a POST request to your application once the transcription is finished.
Open up the download.js file that we created earlier in your code editor.
Just as in upload.js, we will need to import both dotenv and fetch, along with arguments from the command-line.
import 'dotenv/config';
import fetch from 'node-fetch';
let args = process.argv.slice(2);
let id = args[0];
const url = `https://api.assemblyai.com/v2/transcript/${id}`;
Note that this time we are getting the ID as an argument from the command-line and then using string literals to add the ID to the AssemblyAI endpoint for retrieving transcriptions. We will need to set the parameters for fetch again only this time we are doing a GET request so there will not be any body data.
const params = {
  headers: {
    "authorization": process.env.ASSEMBLYAI_API_KEY,
    "content-type": "application/json",
  },
  method: "GET"
};
This is now where the code will differ slightly from the upload code.
Transcription may take a few moments, so when we get a response back from AssemblyAI, we will need to check if the audio file has been processed yet.
We can determine this by checking the `status` of the response. If AssemblyAI says the transcription is still `queued` or `processing` then we will need to try again a little later. If the status is `completed` the transcription text will be included in the response.
Let’s write a function that handles this for us.
function print(data) {
  switch (data.status) {
    case 'queued':
    case 'processing':
      console.log('AssemblyAI is still transcribing your audio, please try again in a few minutes!');
      break;
    case 'completed':
      console.log(`Success: ${data}`);
      console.log(`Text: ${data.text}`);
      break;
    default:
      console.log(`Something went wrong :-( : ${data.status}`);
      break;
  }
}
We are using a simple switch statement here to test if the status is queued, processing or completed. If the status is something else, we will assume that something went wrong. Finally, we can make our API call using fetch.
fetch(url, params)
  .then(response => response.json())
  .then(data => {
    print(data);
  })
  .catch((error) => {
    console.error(`Error: ${error}`);
  });
The entire download.js file should be as follows:
import 'dotenv/config';
import fetch from 'node-fetch';

let args = process.argv.slice(2);
let id = args[0];
const url = `https://api.assemblyai.com/v2/transcript/${id}`;

const params = {
  headers: {
    "authorization": process.env.ASSEMBLYAI_API_KEY,
    "content-type": "application/json",
  },
  method: 'GET'
};


function print(data) {
  switch (data.status) {
    case 'queued':
    case 'processing':
      console.log('AssemblyAI is still transcribing your audio, please try again in a few minutes!');
      break;
    case 'completed':
      console.log(`Success: ${data}`);
      console.log(`Text: ${data.text}`);
      break;
    default:
      console.log(`Something went wrong :-( : ${data.status}`);
      break;
  }
}

fetch(url, params)
  .then(response => response.json())
  .then(data => {
    print(data);
  })
  .catch((error) => {
    console.error(`Error: ${error}`);
  });
Time to test it out!
From the command-line and using the transcription ID returned from the upload function in the command-line, write the following code and press enter
node download.js TRANSCRIPTION_ID
If your transcription’s status was completed, the text should be printed on the command-line.
What next?
You have successfully written a command-line application to upload an audio file URL to AssemblyAI and then download the completed transcription and print it on screen.
For more information on JavaScript and AssemblyAI, take a look at some of our other resources:
- Summarize audio with LLMs in Node.js
- Node.js Speech-to-Text with Punctuation, Casing, and Formatting
- How To Convert Voice To Text Using JavaScript
- How to Create SRT Files for Videos in Node.js
Source: Read MoreÂ
