Role Based Access Control (RBAC) is a useful authorization model for users with different access levels, such as those in a community dashboard.
In this article, you’ll learn how to integrate this type of authorization with Permit.io in Nuxt.
Table of Contents
What is the Difference Between Authentication and Authorization?
When building applications, we often carry out authentication together with authorization. However, these two concepts are essentially different.
Authentication is verifying who a user is. During the authentication process, the user usually needs to log in with some identifier like email, phone, username, with Google, with Microsoft, and so on.
Authorization specifies the resources an authenticated user can view and what they can do in the application. Authorization tells a user’s access rights after that user has been successfully authenticated.
For example, authentication is a user logging in with email and password or verifying their phone number with SMS. On the other hand, authorization is a writer creating and editing posts while only admins can approve and publish those posts.
The primary purpose of authentication is to establish a user’s identity before granting them access to the system. The main goal of authorization is to control user actions and protect sensitive data or resources.
What is Role Based Access Control (RBAC)?
Role-Based Access Control (RBAC) is an authorization model that you can use to manage and restrict access to system resources. It is based on the responsibilities, duties, or roles of users.
In RBAC, roles represent predefined sets of permissions that tell which actions a user can execute in an application. These roles are then assigned to users based on their job functions or responsibilities.
In common systems, anyone can assign permissions to individual users. In RBAC, we group permissions into roles. In turn, we assign these roles to users. For example, in a community dashboard, users might have roles like “Adminâ€, “Mentorâ€, or “Memberâ€.
Aside from Role-Based Access Control, other popular authorization models exist such as Attribute-Based (ABAC) and Relationship-based (ReBAC) access controls. Attribute-Based Access Control uses a wide range of attributes and fits constantly changing systems. You could also combine it with Role-Based Access Control. For more info, see the Permit.io article on RBAC vs. ABAC.
What are the Benefits of Using Authorization As A Service?
You can build authorization models yourself in your application. But it may be time-consuming and cost-ineffective in the long run.
Using an external provider for authorization allows you to focus on the business logic in your applications. The benefits of outsourcing authorization are similar to using a third party like Auth0 or Firebase for Authentication.
Authorization as a Service provides a solution for managing user access and permissions in applications. When you use such an authorization solution, you enjoy enhanced security, granular access policies’ control, auto-scaling policies, reduced maintenance burden, faster upgrades, robust logging, and so on.
Permit.io is free to use for up to a 1000 Monthly Active Users, and has a UI and API for RBAC, ABAC, and ReBAC.
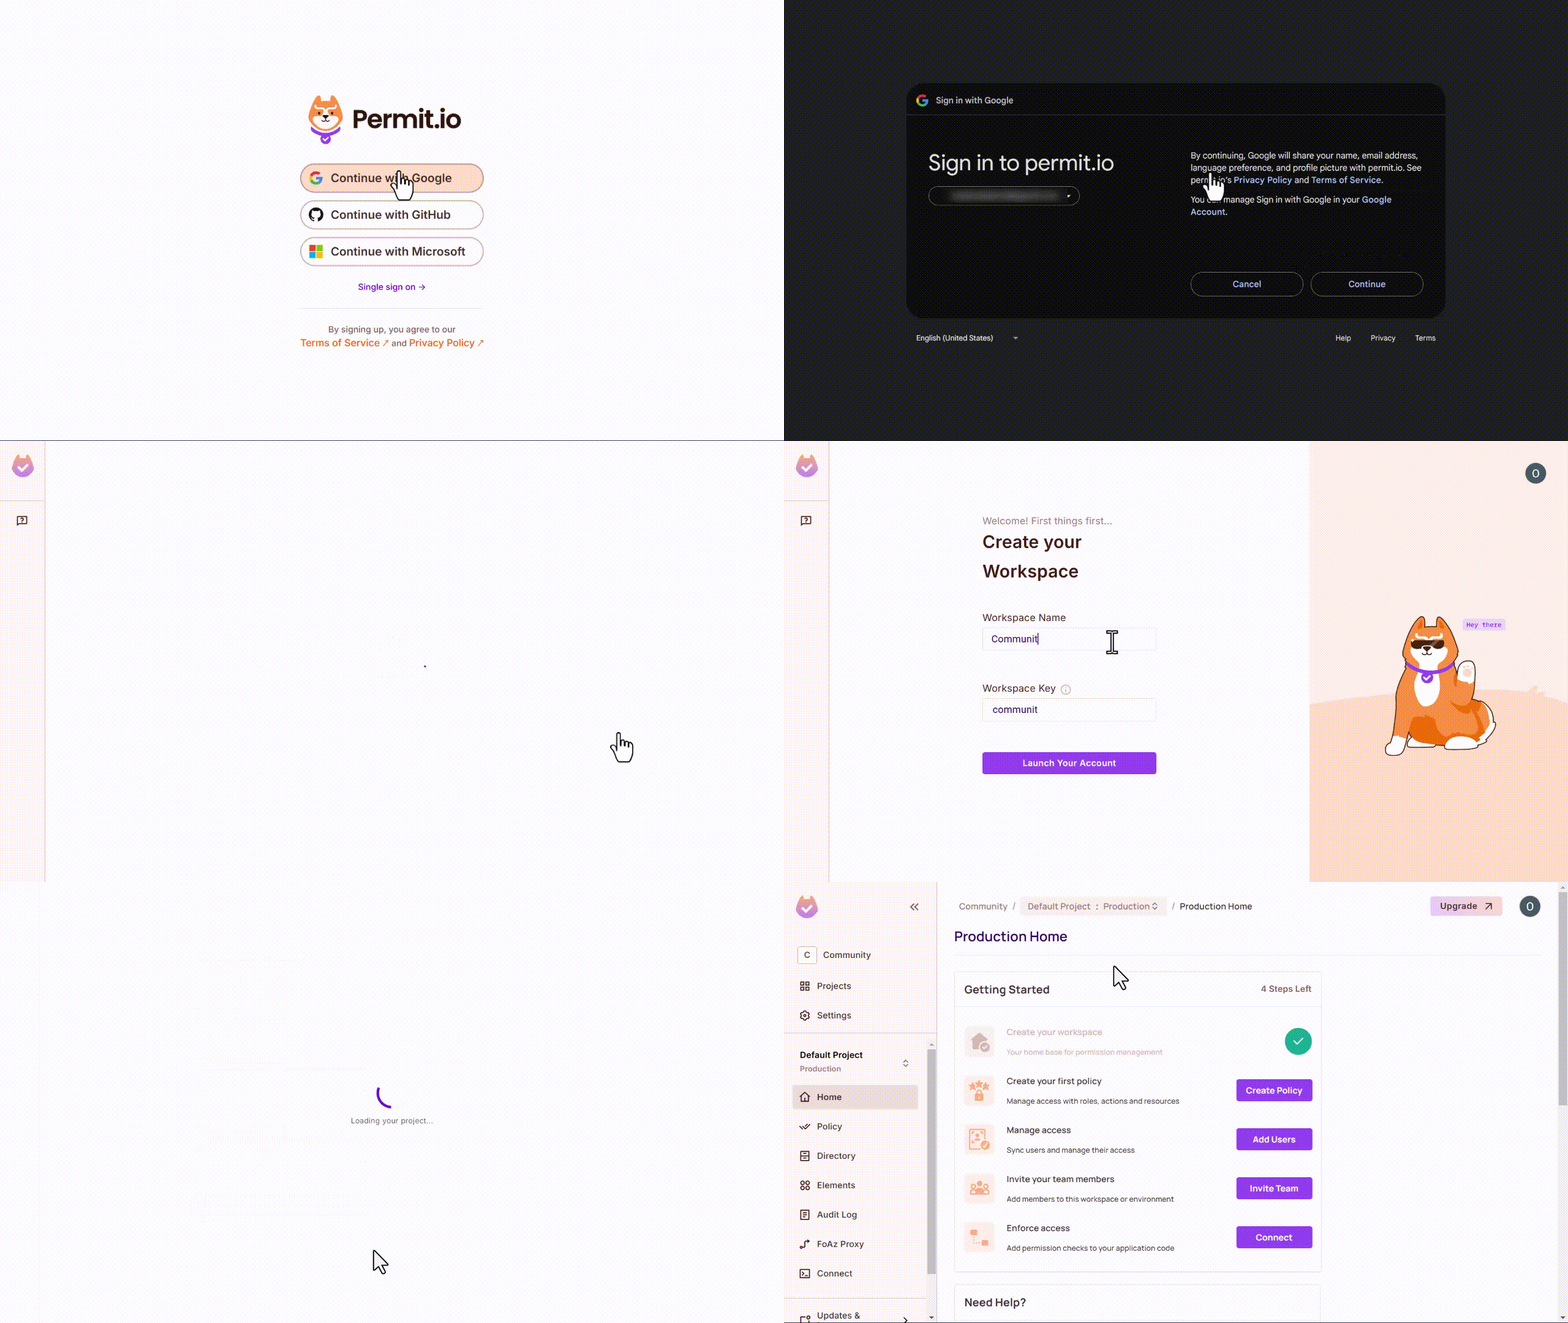
To Get Started with Permit.io:
Go to app.permit.io
Create an account
Create a workspace (in your account)
What We’ll Be Building
A community dashboard connects members within a community or forum. It is a platform where they can interact and access resources.
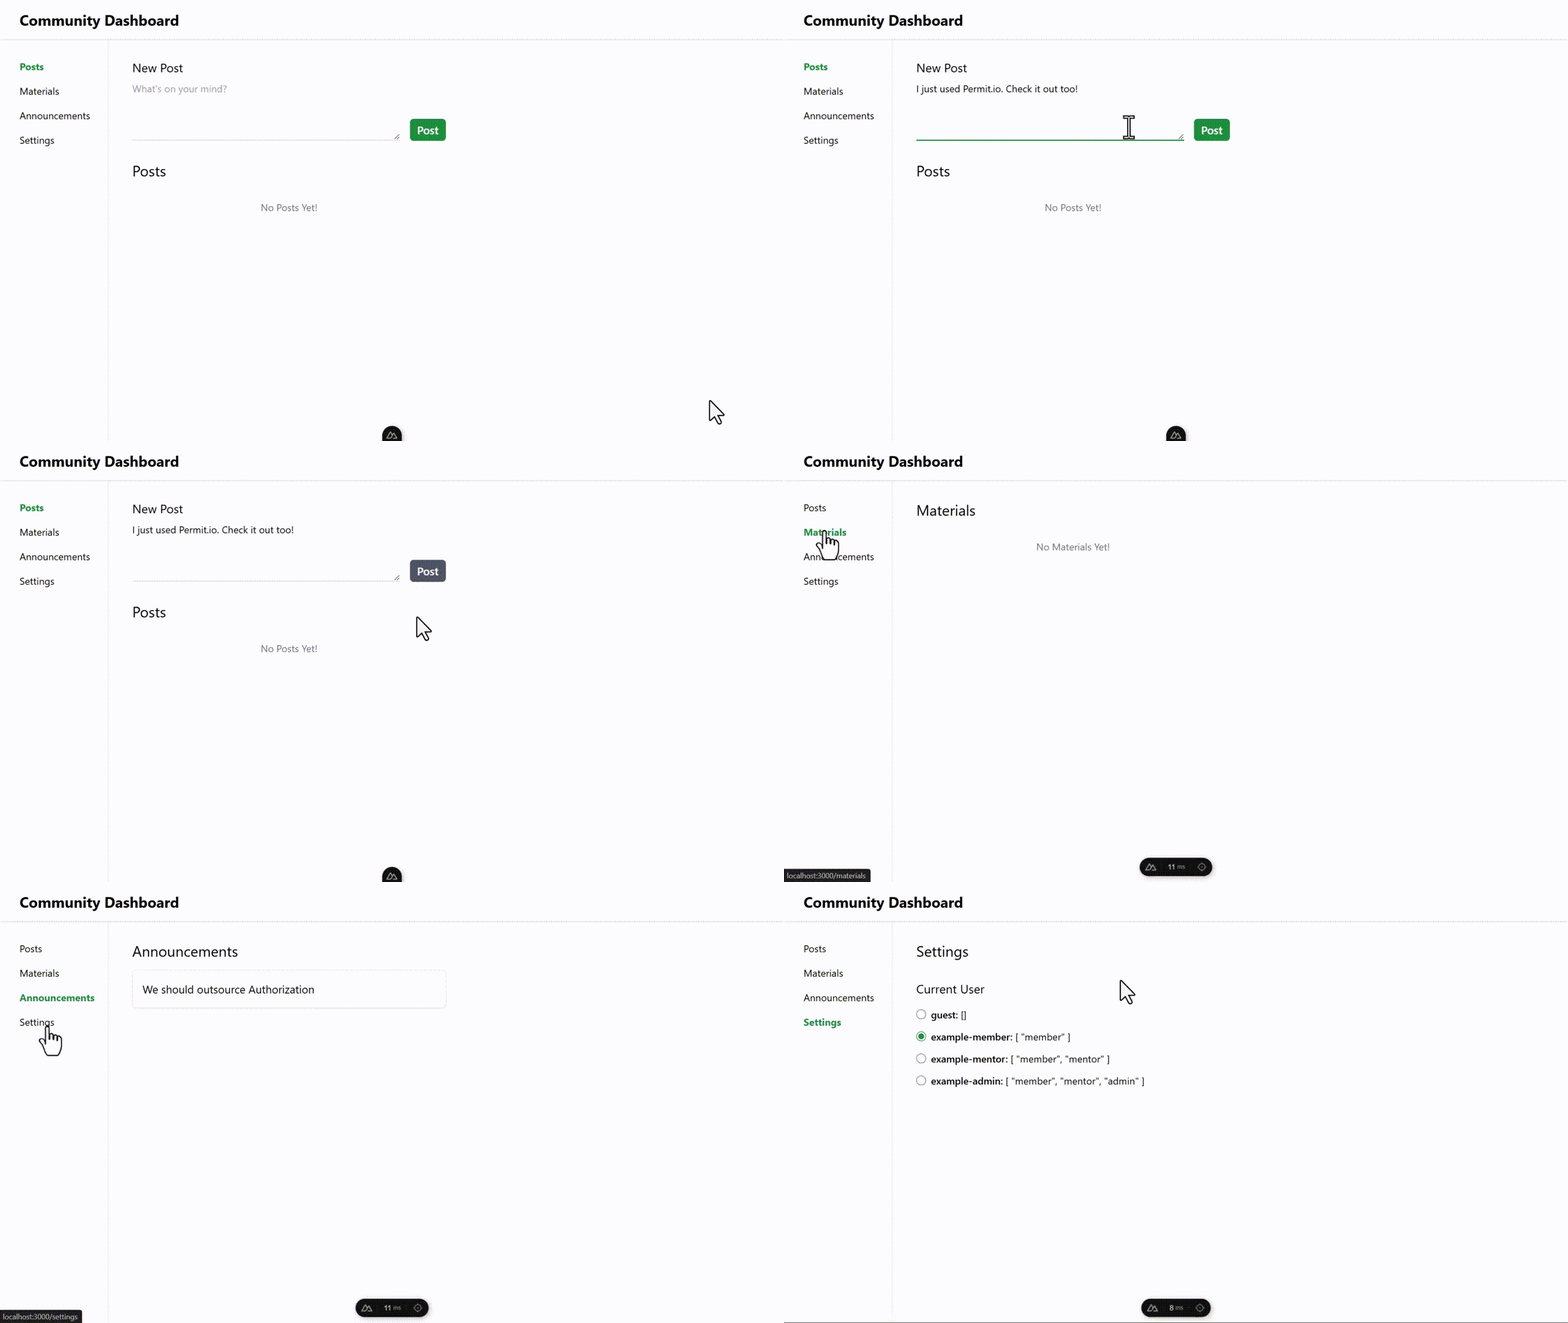
For demo purposes of RBAC, we’ll build a simple community dashboard that will include 3 types of content (entities): posts, materials, and announcements.
The code we will be using is at https://github.com/obumnwabude/rbac-community-dashboard. It consists of a Nuxt repo with its server configured for API calls and its front end built with Vue. Clone it with git and explore the code in an editor/IDE.
In the server, we will expose GET, POST, and DELETE endpoints for each entity (posts, materials, and announcements). In Nuxt, you can use the HTTP verb in the file name for the endpoint handler. So we can have posts.get.ts*, posts.delete.ts, materials.post.ts,* and so on, with each file containing the respective handler for the involved API endpoint.
In addition, the server files store and retrieve entities from JSON files. You should have a robust database setup in your product. For this project, we’ll use local JSON files to build a minimum reproducible example with focus on roles and authorization.
In the front end, we have four pages: three for the entities and a settings page. There is also a simple navigation: a bottom bar on smaller screens and a sidebar on wider ones. Each entity page shows a list of its items and a small form to create new ones.
Furthermore, the demo code uses tailwindcss to style everything quickly. The settings page contains hardcoded user examples and roles for the demo. When testing, toggle the current user and see the roles in action.
This article focuses on the parts of the code that deal with authorization. For the backend and the UI specifics of the community dashboard, we will only overview them. After that, we will deep dive into RBAC touchpoints.
How to Plan RBAC with Permit.io
Overall, planning authorization means mapping out “who†can carry out an action on “whatâ€. In RBAC, we define roles and then assign them to users. The roles and users combo is the “who†part of the authorization.
The “what†side refers to the entities or resources that your application provides or manages. For this article’s example, we’ve chosen our resources as Posts, Materials, and Announcements.
Actions are user activity. The most common actions are “createâ€, “readâ€, “updateâ€, and, “deleteâ€. Per resource in your application, you can use these four actions, add more, or omit some. In this article, our resources will each have all four actions.
When planning authorization, define resources alongside the “actions†users can execute on each resource. After that, define roles. For each role, specify what actions a user holding that role can carry out on each resource. The mapping of resources, actions, and roles allows you to define the authorization policies of your application.
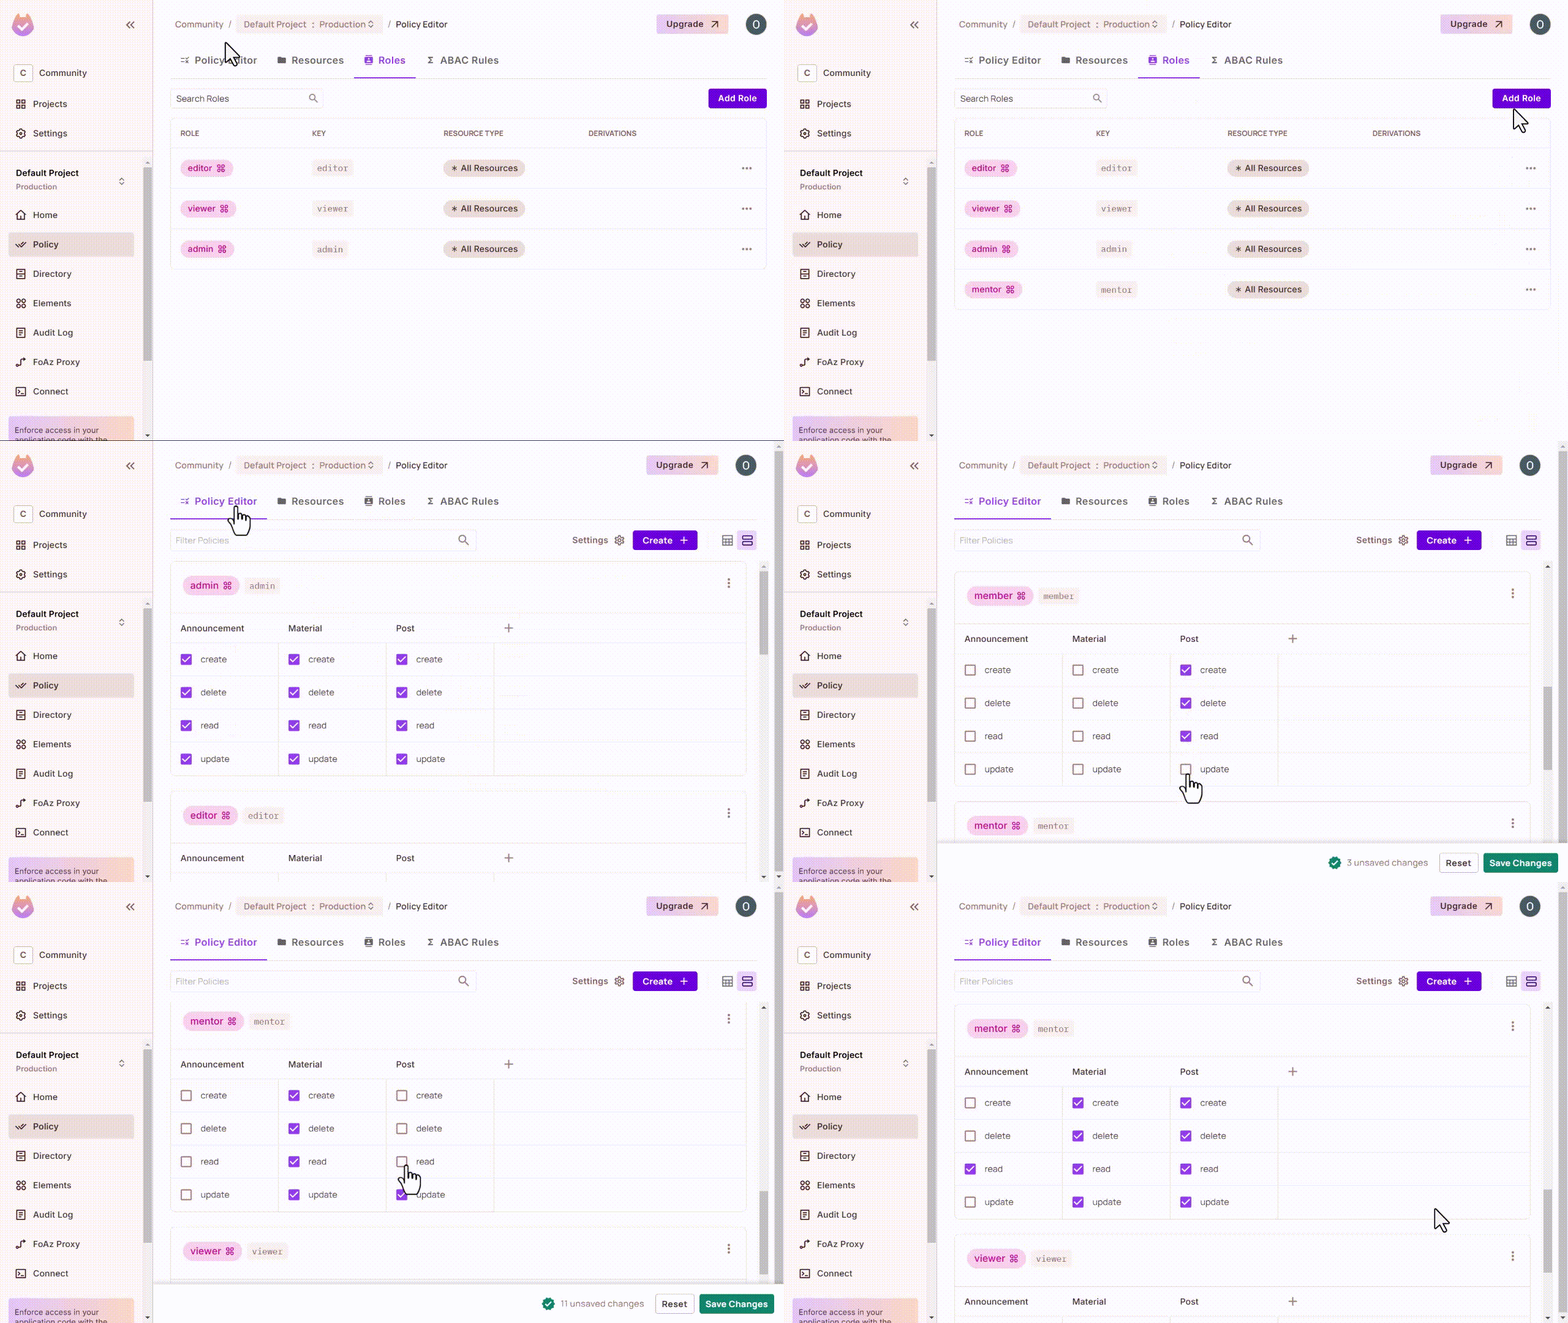
Permit.io makes it easy to edit policies. In Permit.io, you have an intuitive dashboard where you can create resources and their actions, create roles, and merge both with policy tables.
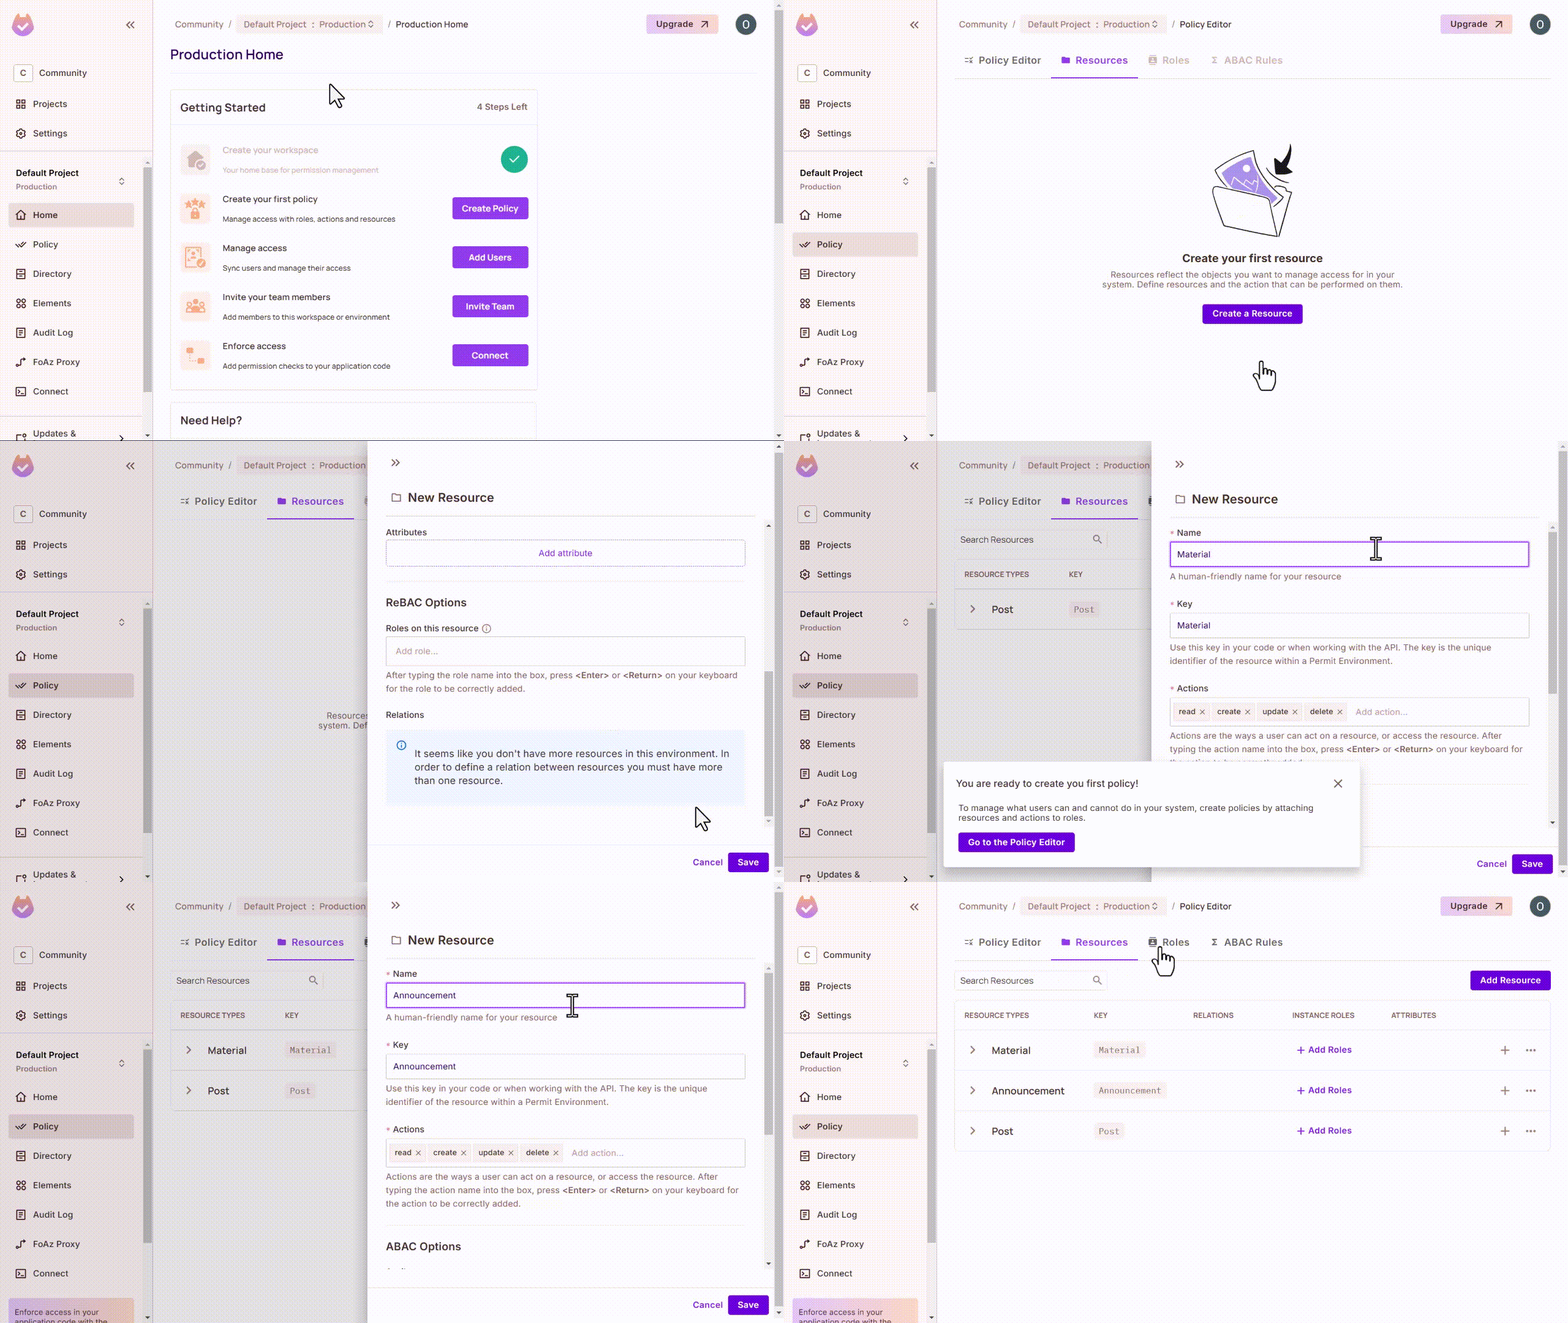
For our Community Dashboard example, we will create three roles with incremental access: member, mentor, and admin. For each role, we’ll allow read access to all resources. However, each role has different management access levels to the resources as follows:
Members can view all entities but can only create or delete posts.
Mentors can view all entities and can create or delete posts and materials.
Admins can create, view, and delete all entities.
Assigning roles to actions in resources is the same as editing policies.
How to Setup Permit.io in Nuxt
For our demo project, you need to run npm install, create a .env file, and export your Permit token.
However, if you are building a new project, to setup Permit in Nuxt, first install it with npm.
npm install permitio
After that, create a .env file and add your PERMIT_TOKEN. Get the token from the dashboard.
PERMIT_TOKEN=permit_key_XXXXXXXXXXXXXXXXXXXXX
To make this token available to the Nuxt runtimeConfig, add it to the nuxt.config.ts file. Also, add permitio (alongside other dependencies) in the transpile array of the build property of the Nuxt config file.
This addition is to account for Nuxt’s specific optimizations. Your nuxt.config.ts file should look like the following:
// https://nuxt.com/docs/api/configuration/nuxt-config
export default defineNuxtConfig({
  // ... other properties

  build: {
    transpile: ['axios', 'permitio', 'pino']
  },
  runtimeConfig: {
    permitToken: process.env.PERMIT_TOKEN
  }
});
After these, Permit.io should be available to your server code in Nuxt. You can now use in it middleware code to check for permissions.
How to Control API Access with Nuxt Middleware
In simple terms, middleware is code that runs before a target handler. In Nuxt, you can add middleware for API endpoints by creating necessary files in a middleware directory contained in the top-level server directory.
Since we are dealing with permissions, we will name our middleware file permissions.ts. Here, you’ll check if a user is permitted to take an action on a given resource.
Permit.io makes this easy with a simple .check method that returns a Boolean indicating if the user is permitted.
await permit.check(user, action, resource);
For this simple example community dashboard, our middleware code will first try to determine the user and action from the request properties. The example code achieves that in crude ways. They are enough to explain the concept and you should use more robust industry-standard methods for this.
After that, in the example code below, we construct the Permit object using our permit token and the default public PDP (Policy-Decision-Point microservice)’s endpoint. The Permit PDP is open-source. If you wish, you can set up your local/personal PDP by following the steps here.
import { Permit } from 'permitio';

export default defineEventHandler(async (event) => {
  // Only check permissions if the request is a POST or DELETE request
  const { method, path } = event;
  if (method !== 'POST' && method !== 'DELETE') return;

  // Ensure authorization header is present
  let authorization = event.node.req.headers['authorization'];
  if (!authorization) throw new Error('Unauthorized');

  // Extract the user from the authorization header. This is for example
  // purposes only. In a real application, you would use a JWT library or
  // better authentication methods in your API.
  const user = authorization.split(' ')[1];
  if (!user) throw new Error('Unauthorized');

  // Extract the resource from the path. This is for example purposes only.
  let resource = path.split('/').reverse()[0]; // get the last part of the path
  resource = resource.slice(0, -1); // remove the trailing 's'
  // Capitalize the first letter
  resource = resource.charAt(0).toUpperCase() + resource.slice(1);

  // Set the action on the resource from the request method.
  // This is for example purposes only. In a real application, you would
  // have a more robust way to determine the action.
  const action = method === 'POST' ? 'create' : 'delete';

  // Construct the Permit object. Use the token from runtime config.
  const config = useRuntimeConfig(event);
  const permit = new Permit({
    pdp: 'https://cloudpdp.api.permit.io',
    token: config.permitToken
  });

  // Check if the user is permitted to create the resource.
  // If not, throw an error.
  const isPermitted = await permit.check(user, action, resource);
  if (!isPermitted) throw new Error('Unauthorized');
});
As you can see, if the Permit checker fails, an error will be thrown. This will make Nuxt to prevent unauthorized resource management in your system. Such separation of concerns is efficient, especially in Authorization.
How to Test RBAC in the Community Dashboard
The settings page works together with the stores/permissions.ts file to complete the flow in the front end. We hardcoded the roles and the “user IDs†to ease toggling and testing. You definitely won’t have this in a production application. You can integrate CASL for permission checks in a frontend.
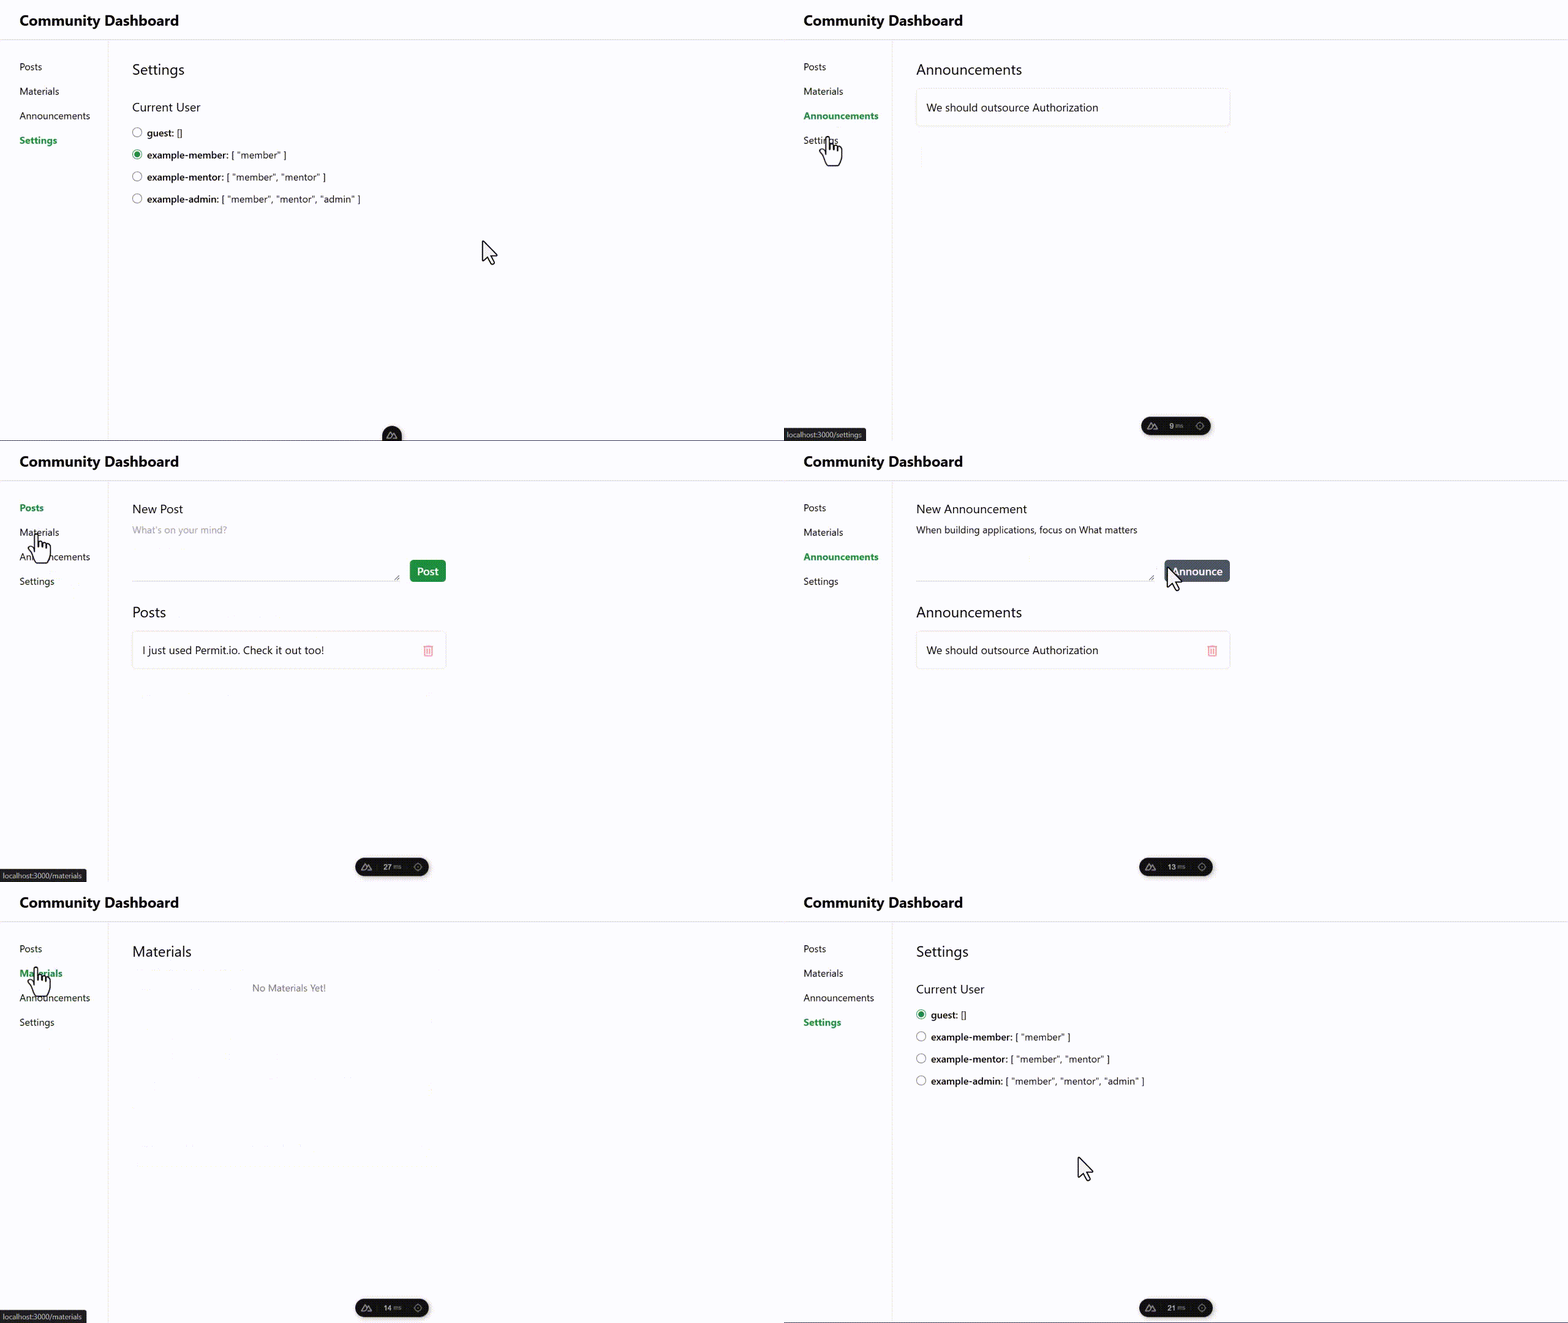
In this demo community dashboard, the UI touchpoints only allow edits of entities for which the acting user has the right roles. In other words, you can only add or delete an entity if the current role in the settings page allows that. Let’s see this in action.
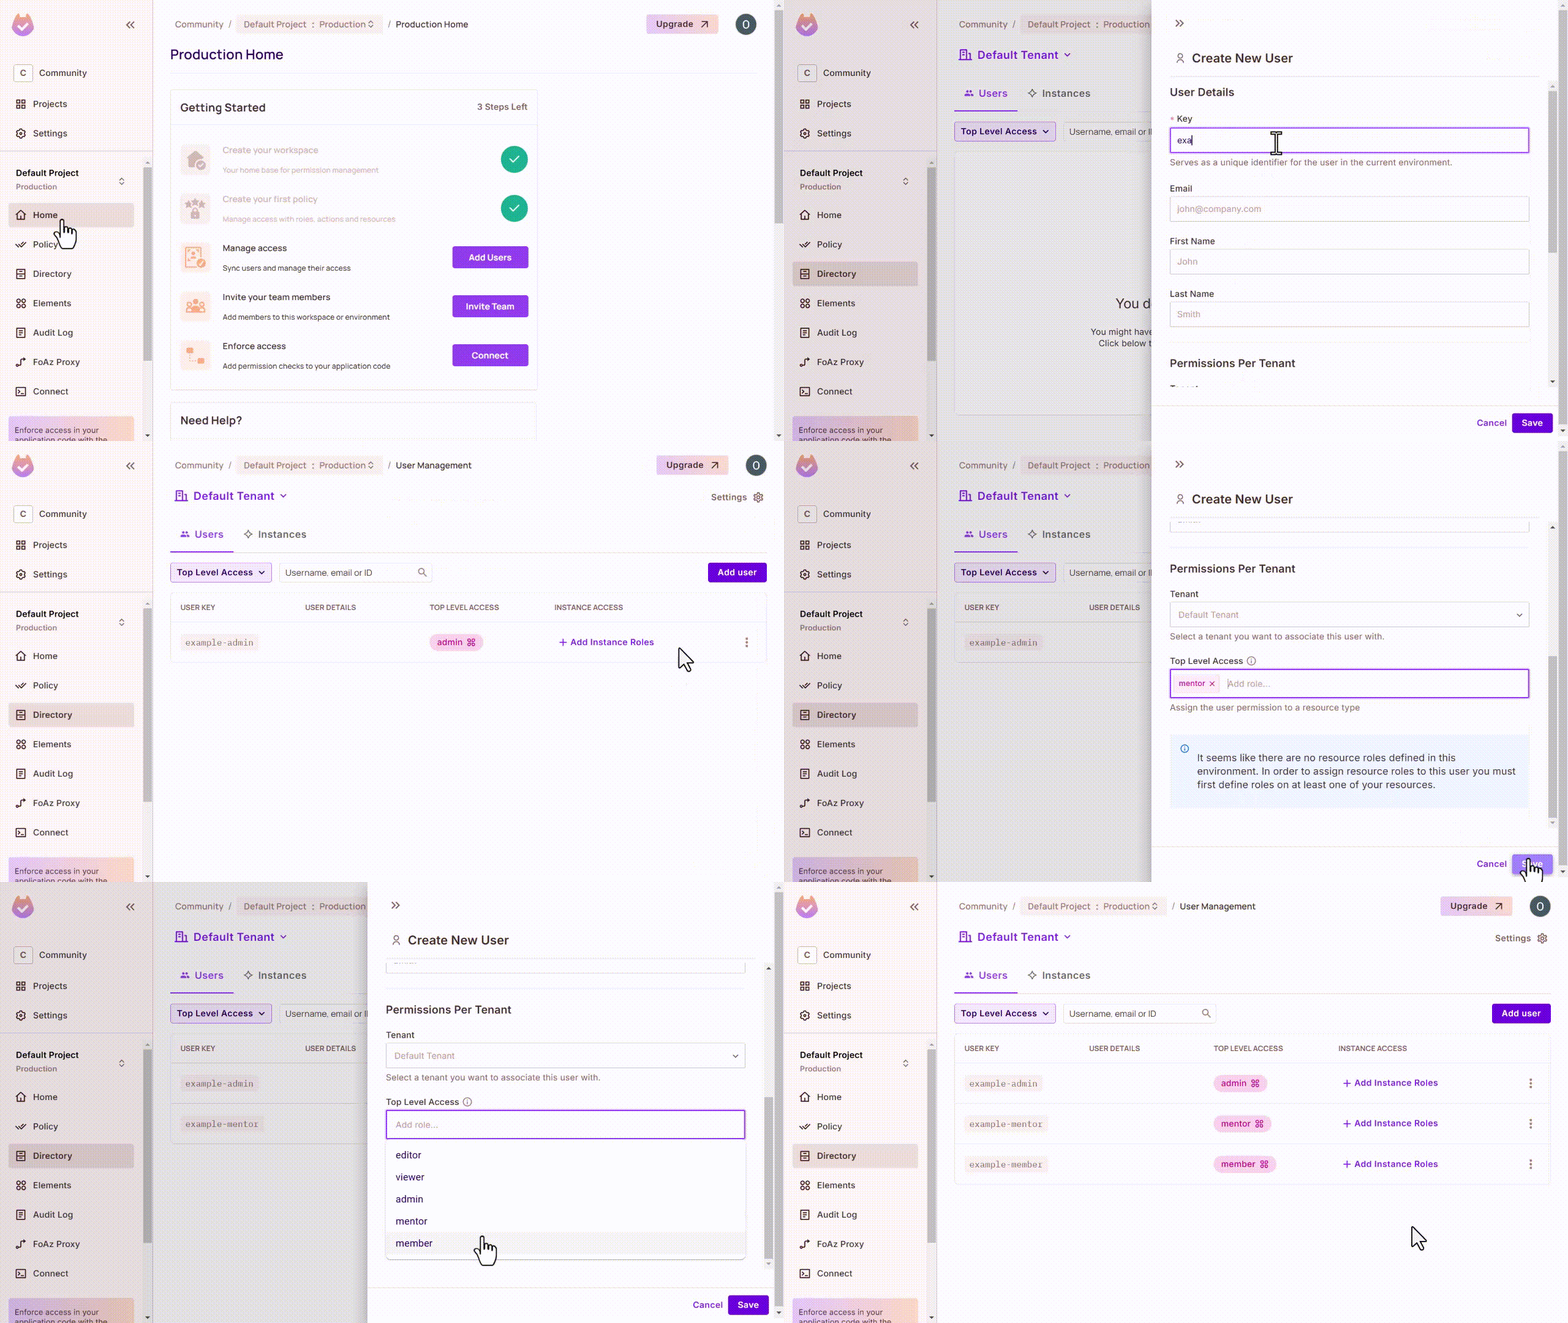
In the Permit.io dashboard, create three test users: “example-memberâ€, “example-mentorâ€, and “example-adminâ€. Assign the respective roles to each user.
Start up the Nuxt app by running npm run dev. Visit localhost:3000 in your browser and explore the role-based authorization in the demo community dashboard.
You can see that when you set the Current User to admin, you can create and delete announcements, but when set to guest, you can only view entities and not manage them. With this, we’ve fully implemented authorization.
Summary
You can be more efficient in building your application by focusing on business logic and outsourcing crucial parts like authorization.
In this article, you learned how you can use an authorization solution (Permit.io) to implement Role-Based Access Control in a demo community dashboard with Nuxt. You can also use Permit in any other kind of application (not just community dashboards).
When planning authorization, define resources alongside the “actions†users can execute on each resource. After that, define roles as the permissions the users can have.
Cheers!
Source: freeCodeCamp Programming Tutorials: Python, JavaScript, Git & MoreÂ
