While using one of your favorite websites, you might have often thought, “What if this website had this particular functionality? That would be great!”
If you have ever had such thoughts, this article is for you. In it, you’ll learn how websites communicate with servers and get data and how to work backwards to understand how that website functions.
You will also see how to add functionality to a website or use its APIs to recreate it yourself. You will use a simple demo website in the article to do that. The website contains some sales data grabbed by a remote API. In the demo, you will use the website to see what APIs have been used to get the data and how to use the sales data API.
If you understand how to access the data API on this website, you can use the same methodology to access this data on any website you like.
Prerequisites:
This article should be accessible to anyone who knows the basics of programming. You will see examples in JavaScript, but you can use these techniques in your favorite language. Having some basic knowledge of how the web works will also be helpful.
You need to install the project from GitHub and run it to experiment with this tutorial.
What We’ll Cover:
What is an API?
Application programming interfaces (APIs) allow two computer programs to communicate. You request the data you want to use in your project from an API, and the API fetches it for you.
These APIs can be local (like Windows APIs, Web APIs, and so on) or remote (like the APIs that developers provide through the internet, such as the Weather API and website APIs).
This article will focus on remote APIs, since developers often use this approach on modern websites. Websites use APIs to display results based on a response.
Some companies might provide access to their APIs so you can develop on top of them, but this is only the case for some. Sometimes, an API might need to provide the functionality or design you want. So, first, you should look at what a site offers and use it to create the features you want.
In this tutorial, you will learn how to understand and explore the APIs behind a website so you can use them in your projects. You will first learn how APIs work, then explore what reverse engineering means. Then, you’ll use a demo website and an example through Postman, where you will use an API to get some data from the website. You’ll be able to use this data anywhere you want.
How Do APIs Work?
The structure of an API contains two levels: the client and the server. The client requests data from the API, and the server provides it. This technology has been around for a long time and is now standardized.
The client starts to request the data by connecting with the correct endpoint and providing the related information for the server. The server checks this data, and based on that, it does its magic and returns a response to the client about which process to use.
Here is a simple drawing showing this process:
API requests and responses usually have a similar structure, which is:
Request:
-
Endpoints: the target URL of the API.
-
Methods: tell the server what to do with data, like get the data, update it, delete it, and so on.
-
Parameters: extra details you provide to the server for additional requests, like the topic, category, and so on.
-
Headers: these key-value pairs provide information about the client, authentication, and more.
-
Body: this is the actual data provider, which includes whatever the client wants from the server.
Response:
-
Status code: this three-digit HTTP status code tells the client about the server’s result.
-
Header: this is similar to the request but has the server’s information. It could be setting cookies or other details.
-
Body: has the actual data from the server to use.
Now that you know a bit about APIs and HTTP requests, you can reverse engineer a website.
What is Reverse Engineering?
Reverse engineering is the art of analyzing a system to understand how developers built it. It helps you figure out how it functions so you can improve or hack it.
Some people use reverse engineering to crack programs. Others use it to customize them or even add extra functionalities.
As for websites, the reverse engineering process will help you understand what APIs a site has and how it’s using them. It enables you to write your program based on the site’s APIs.
Sometimes, reverse engineering can be used to find bugs, crack software, or even use an API without permission. Website developers tend to prevent that by providing an official API for their website, setting limits for API usage, and detecting any unauthorized use.
For this reason, when you start to reverse engineer any program, you will need to consider the terms of use and the legal side of your work so that you’re not doing anything illegal or unethical.
How to Reverse Engineer a Website
To reverse engineer a website, you need to do two things: first, you need to explore the website to see how it works and learn what kind of data and endpoints it provides. Second, you need to set some assumptions about how it works and try to validate the assumptions.
A simple assumption would be that after logging into the website, the website receives authentication information through API requests. Getting this information will allow you to use the website APIs without the need to log in every time.
To validate this assumption, you’ll need to investigate the requests sent and received by the website. Then you’ll need to send your requests by yourself from an external source like your terminal through CURL or HTTP client like Postman.
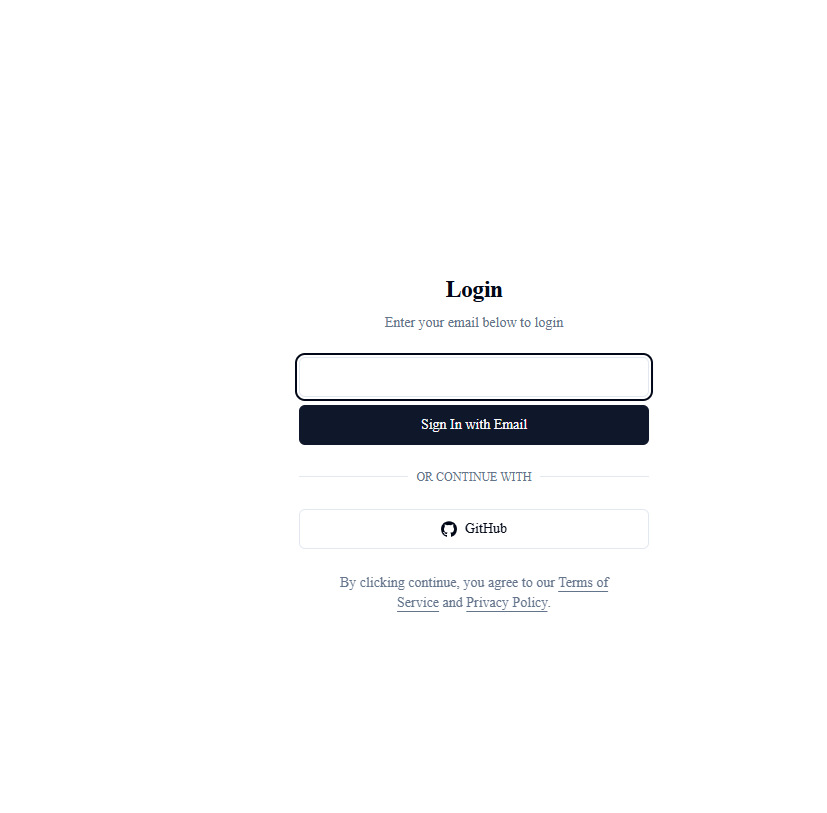
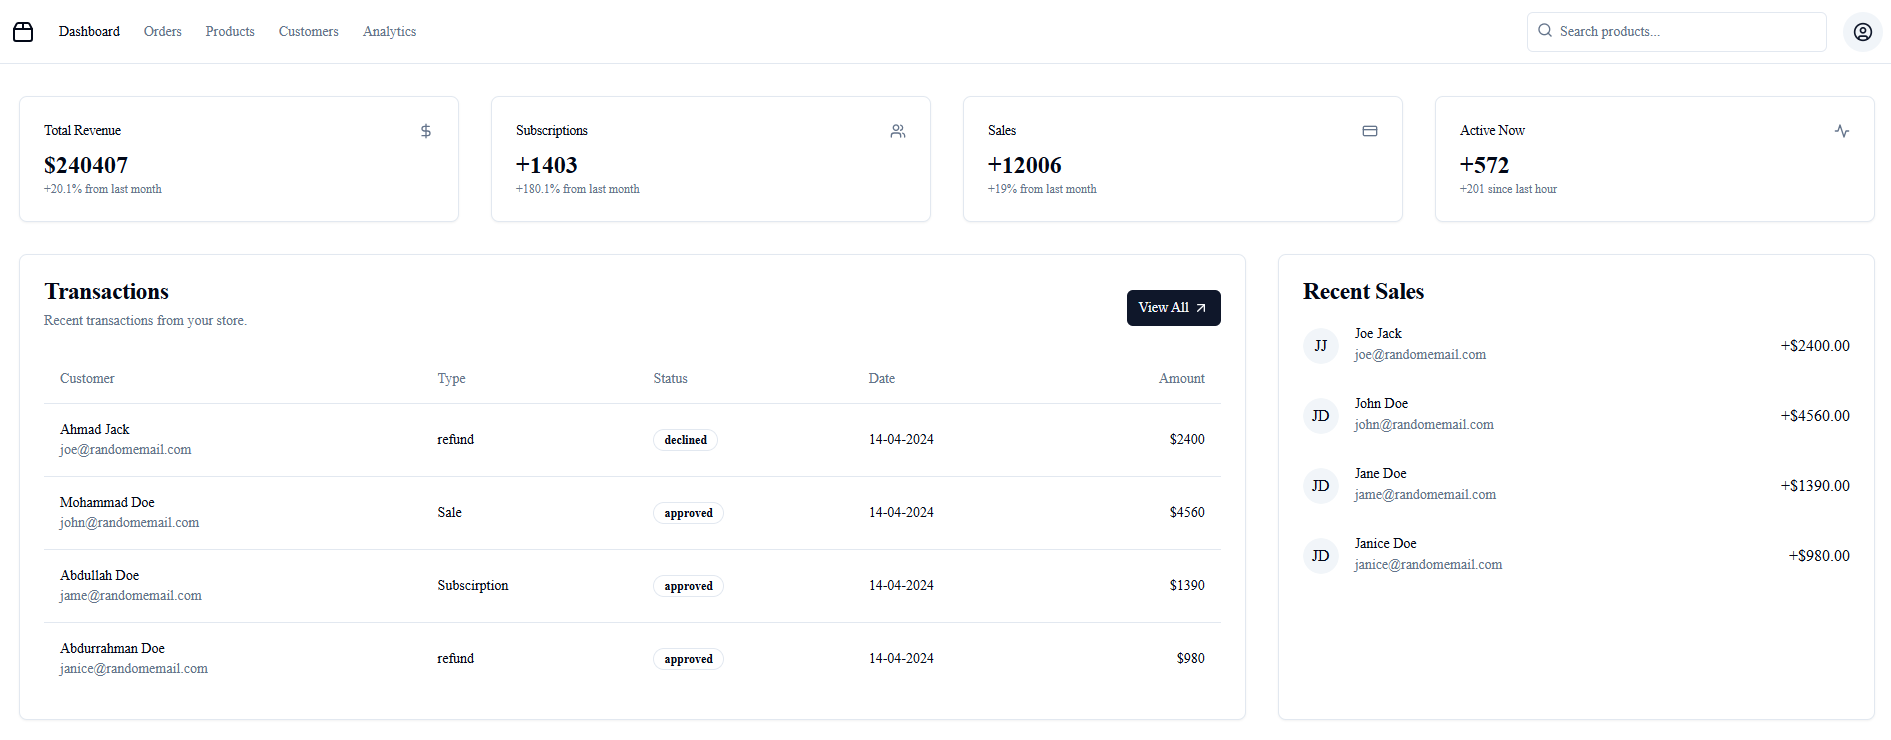
I have created a demo website that we’ll reverse engineer. You’ll run the website on your computer and then reverse-engineer it. The website shows you a simple login page and has some customer data. Your goal will be to get the customer’s recent sales data.
Here are a couple screenshots of the website and what you have:
Page 1: Login:
Page 2: The website data
Explore the Website
The first step in reverse engineering is to explore the website and see how it works. To do this, you’ll use Chrome developer tools to check the requests sent by the website and see how they affect it. You’ll also look for data received by those requests and see how you can use them.
At the same time you’ll need to filter the requests since some of them don’t send or receive data, but they get various files that the website uses, like CSS files or images.
Chrome developer tools help you analyze and understand a website, showing you the HTML elements, network, and storage that the website uses.
Check the Sales
Your target is to check the website’s sales, so you need to log in to access the website and go to the dashboard page to check the sales.
On the sales page, you will do the following:
First, open Chrome dev tools (by either clicking on F12 or right-clicking anywhere, then opening Inspector) to see what kind of APIs the website provides.
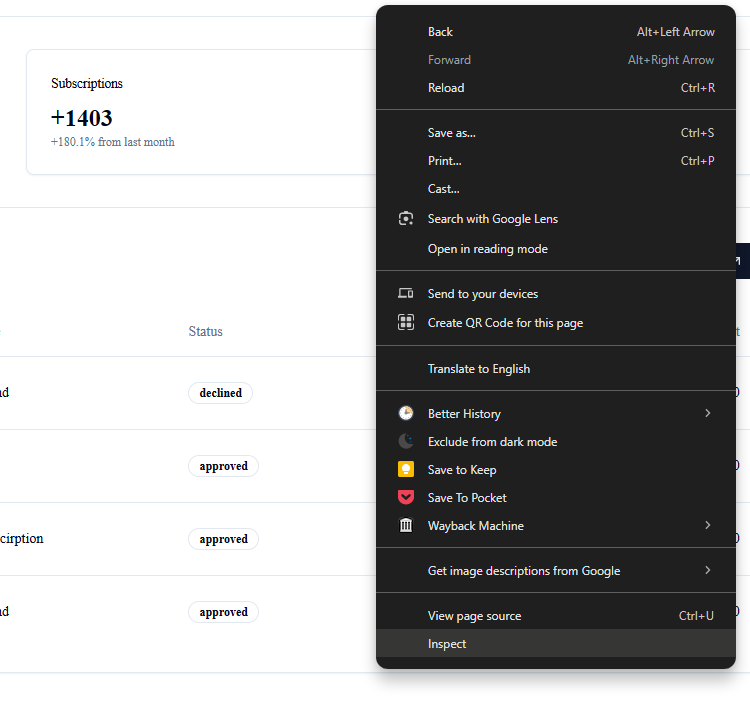
Then, after opening the dev tools, you need to go to the network tab to check the network requests and see what the website sends to the server.
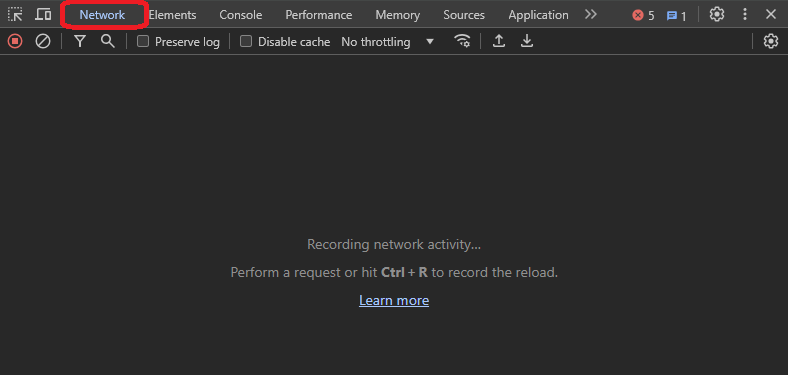
The network tab shows you the requests sent from the website to the server and how the server has responded to them.
As you can see in the previous image, you have an empty network in the dev tools. An empty network happens when you open the dev tools after the website sends the calls. A refresh (F5) on the website will be enough to check the calls.
In the following image, you can see the requests sent from the website to the server. If you analyze the request names, you will find one of the requests called sales, which is the one that has sales data. You can open the call and see the result of it.
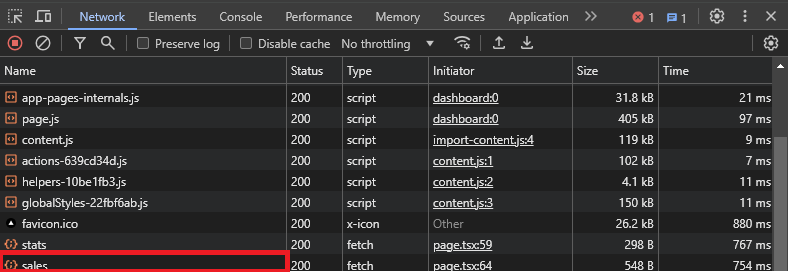
If you click on the call, you will see that you have the headers, cookies, responses, and so on.
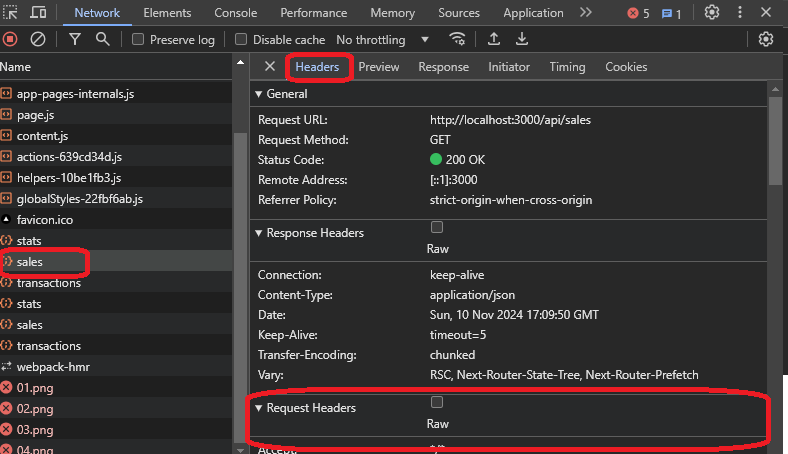
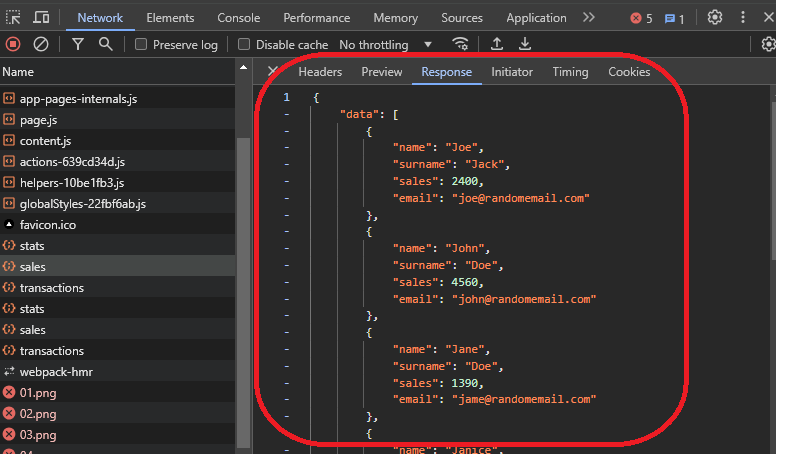
These tabs will help you understand the result of the call, the origin, and the request and response of the request. If you go to the response tab, you can see the sales data as JSON, which is what the website uses.
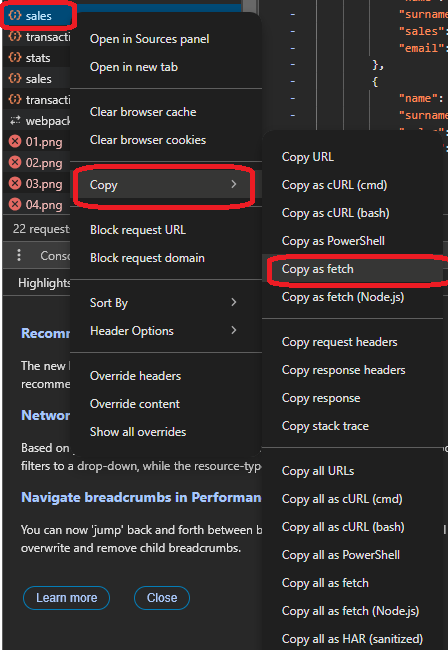
Right now, since you have this call, you can use it in the browser to get the result. To do this, you need to use the fetch function from JavaScript. This approach will help you see the function’s result and how it works.
A simple way to do that is to click on the call, then go to “copy,†and choose “copy as fetchâ€. In this case, “fetch it†means copying the request to reuse as a fetch call in JavaScript, with all of the headers and body included in the copied text.
Here is the code of the fetch:
let fetchResult = fetch("http://localhost:3000/api/sales", {
"headers": {
"accept": "*/*",
"accept-language": "en,tr-TR;q=0.9,tr;q=0.8,en-US;q=0.7,ar;q=0.6,it;q=0.5",
"sec-ch-ua": ""Chromium";v="124", "Google Chrome";v="124", "Not-A.Brand";v="99"",
"sec-ch-ua-mobile": "?0",
"sec-ch-ua-platform": ""Windows"",
"sec-fetch-dest": "empty",
"sec-fetch-mode": "cors",
"sec-fetch-site": "same-origin"
},
"referrer": "http://localhost:3000/dashboard",
"referrerPolicy": "strict-origin-when-cross-origin",
"body": null,
"method": "GET",
"mode": "cors",
"credentials": "include"
})
You can consume this call by using this code:
fetchResult.then(res => res.json()).then(console.log)
Here is the result of the fetch:

As you can see, you were able use the API to get the sales results and explore them. You can now use this data anywhere on the current website and fetch the sales API programmatically.
Doing this fetch through the browser’s developer tools will assume that you are doing it in the website’s name. This will add extra headers to the API request, like the current website hostname in the headers and current cookies attached to the API request.
But what if you’re going to use the API outside the same website? You might wish to use the API on your website or a server. By using it on your website, I mean getting the sales data and showing it as a widget on your website, or even getting these data to store them on your server and process them to do data mining.
Using the data outside the host website would require a different hostname to be attached to the headers and other cookies connected to the API request. For these cases, you will need to use Postman, an HTTP request-testing software that helps you test, explore, and read API request data.
How to Use the API on Your Website
Since you got the API endpoint from the previous section, which was the following:
http://localhost:3000/api/sales
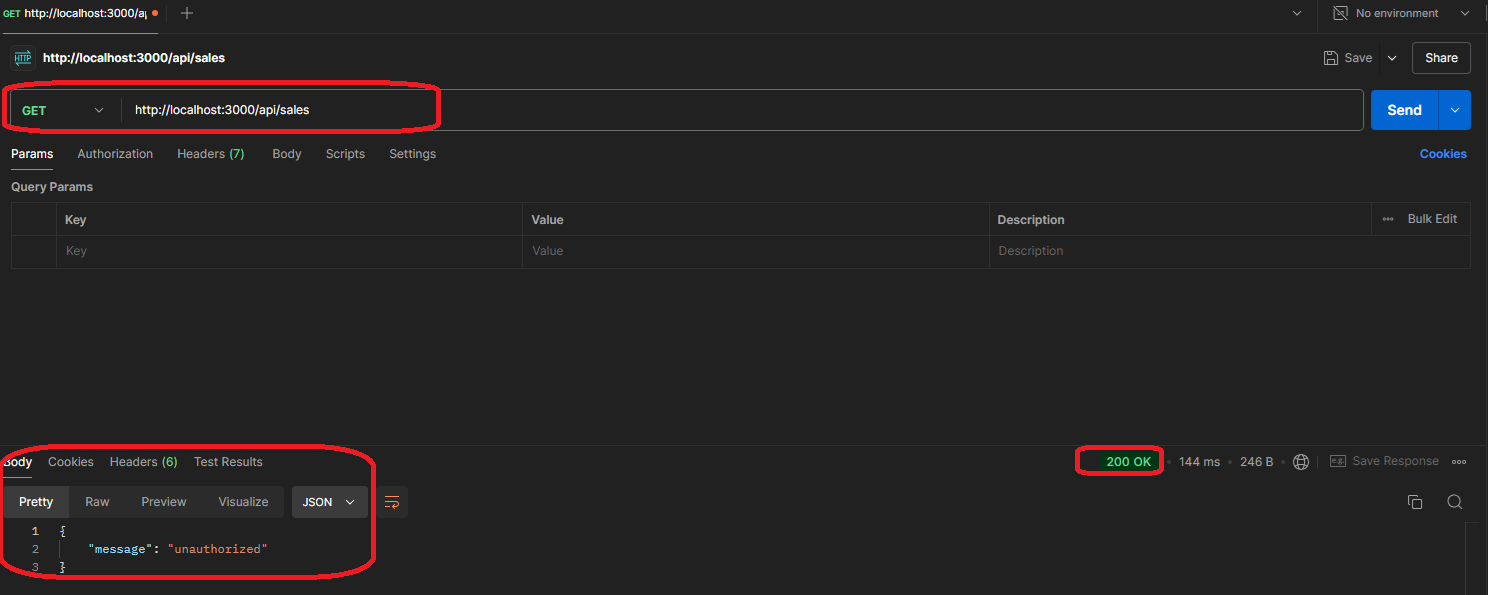
You might expect to use this URL and fetch the data you used before – and have it work immediately in Postman and be able to use it on your website. But it doesn’t work like this, since this fetch request does not contain any data about the authorization.
You can try it in Postman yourself to see the error. Postman provides two ways to write the fetch URL: the first one is to write the call in the Postman UI, and the other one is to import the API call to try it (as you can see in the image below).

To import the fetch request to Postman, first you need to click on the call from the network tab and copy it as:
-
cURL (Bash), then paste it to Postman. Copying the call as cURL (Bash) will allow you to get the headers and all related data from the website, like cookies, and so on.
-
URL only, which will have the URL without having extra data.
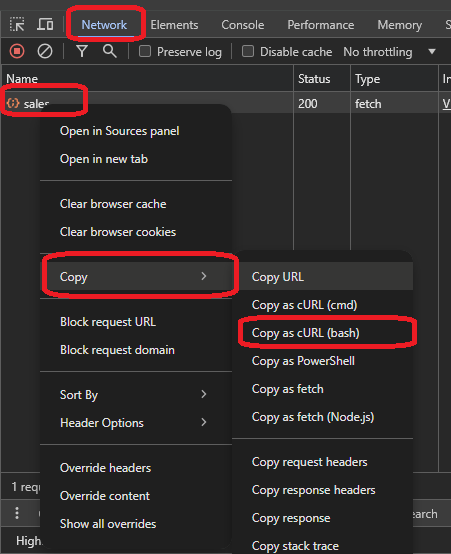
For this article, you will copy it as a URL and paste it into Postman. You’ll do that to get a clean API call without the connected headers and cookies. Then, you’ll click on the send button in Postman to make the request and get the result from the API.

When you click on send, you will see that you’ve gotten an unauthorized message from the API body and a status code of 200. The unauthorized message happened because you did not log into the website from Postman, and the status code is due to the API design. Some APIs might return a status code 401: unauthorized, which you might encounter on other websites.
Being unauthorized means that you are not logged in and do not have permission to use this specific API. Some APIs are public, which you can use without any API key or extra details. Other APIs need authorization in terms of using a username and password or even a key provided by the API provider.
In this example, we are using a private API which needs to be authorized. Here you are getting the data that you are only allowed to access.
How to Get the Authorization and Explore it Through the Website
Based on the previous section, when you tried the API call, you got a message telling you that you are unauthorized. The request needs authorization.
So you need to establish an assumption about authorization by saying that you can get the authorization information from the login page in the demo website. For the assumption here, you might think about how the website is using the username and password to record the session. Usually websites record the session through cookies.
After getting logged in, you will be able use the API call to get the data you want.
To try that, you can go through the following steps:
To figure out what the website is doing to get authorized, you can either:
-
Try copying the URL as bash and seeing what extra cookies and options you get
-
Try logging in, getting the data from the login, and sending it to the protected call
Checking the login method
You need to figure out how the website login function works and what data is being sent to the server to verify the API request and get authorized. So, you should check the login page and analyze the requests.
Here are the steps:
-
Go to the login page
-
Open the dev tools
-
Go to the network tab
-
Click on the login button
When you click on login, enable the preserve log option to preserve logs when you browse through different pages or the website redirects you.
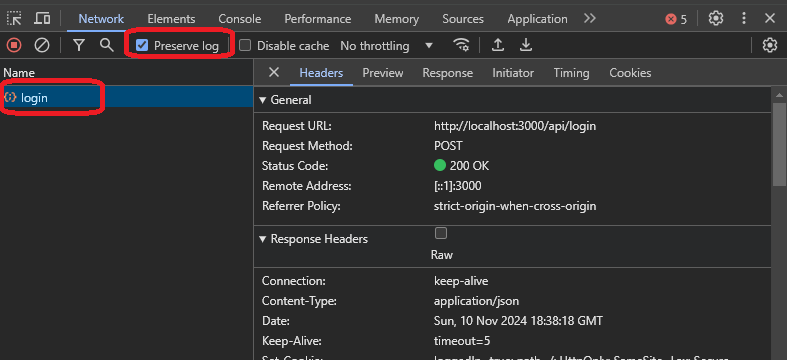
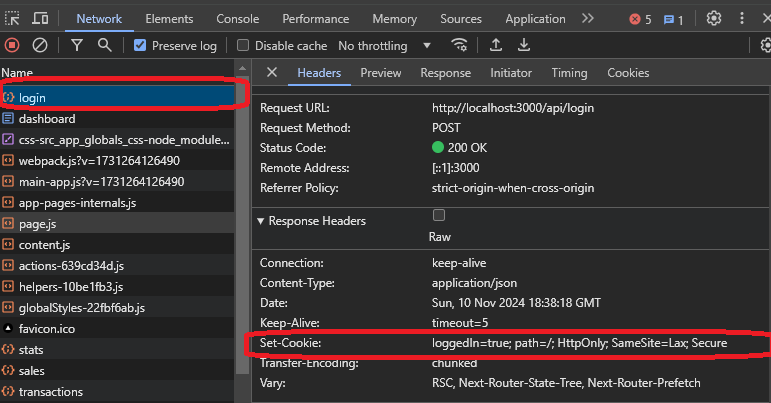
As you can see from the image above, you got a login call from the website. You need to explore the call and see what results you get from it. Here is the explanation of the data from the response:
The response:
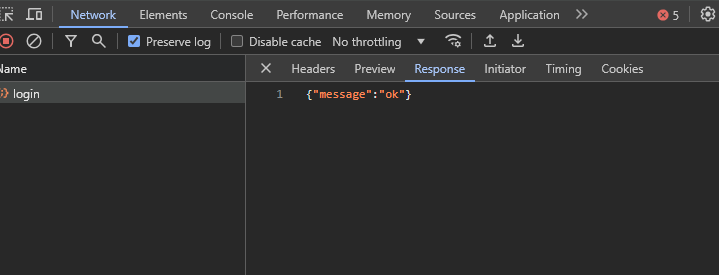
In the above image, you can see that you got a message that just says “okâ€, which does not provide much detail. Right now, you need to check the headers and the cookies to see what the server sent and if you can use the server headers for authentication.
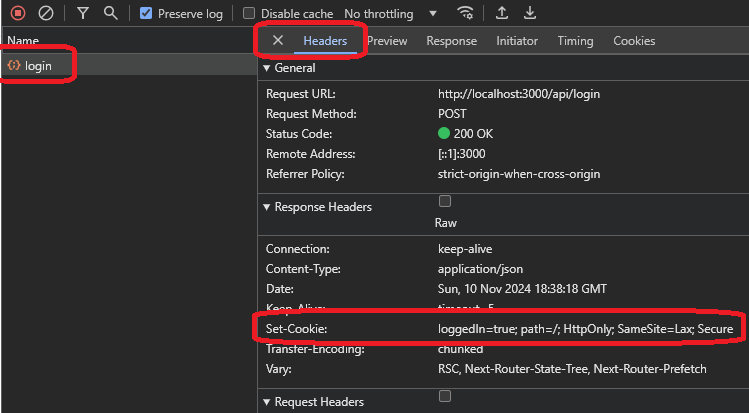
If you check the headers, you can find a response header called set-cookie, which is responsible for setting a cookie on your machine. This one has a loggedin=true value, indicating a log-in flag that the website could use.
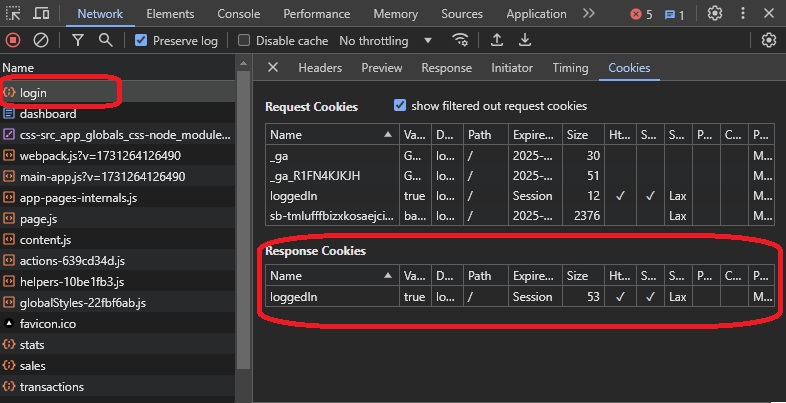
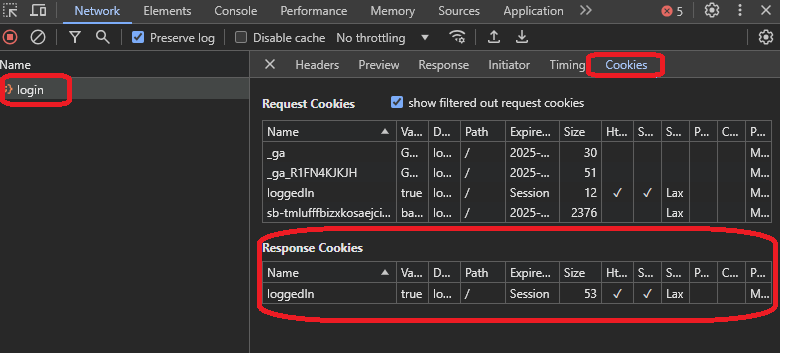
You will see the same value when you go to the cookies tab.
Here, you might think that having a cookie sent with the “sales†request header could authorize the request. To double-check that, you can open the sales request from the dev tools and see what extra details the request headers have, from headers or cookies:
If you go to the cookies tab, you will notice the request did send the same cookies:
To ensure the cookies are the reason, you can return to the Postman call and add a cookie to test the call.
You need to do the following:
-
Open the headers tab
-
Add cookie as header
-
Send the request
-
Check the result
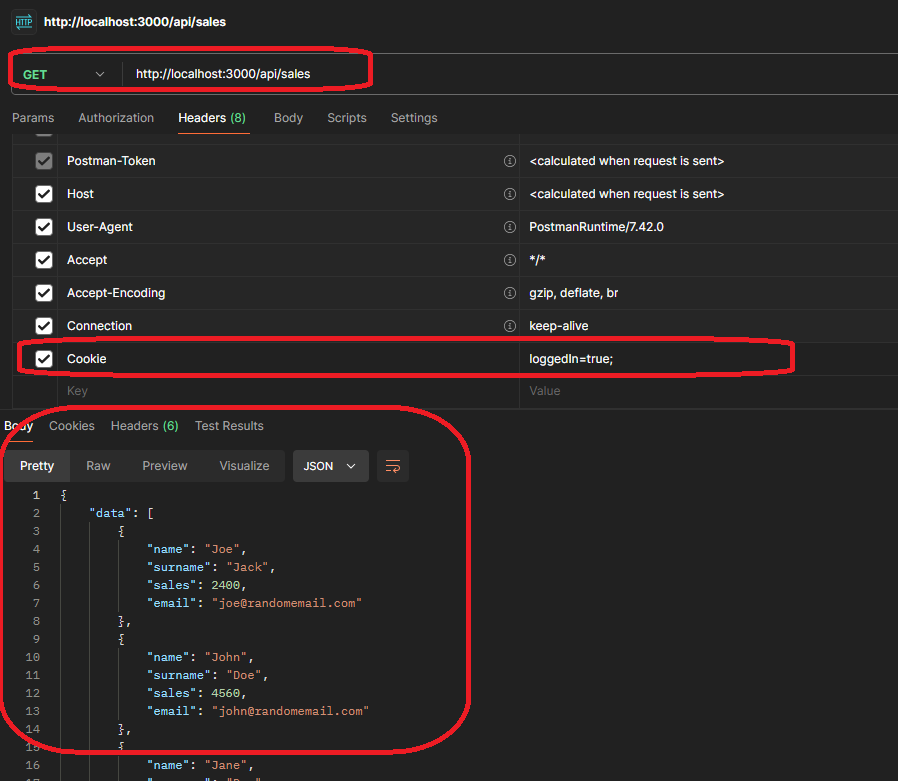
As you can see, you got a result of the data, which means that the server authorized the request, and you can access the data. Getting the data confirms the hypothesis you set in the beginning: the endpoint needs authentication.
Checking the sales with cURL (Bash)
A more straightforward and more accessible way to do this would be by copying the request as cURL (Bash), which brings all the options to Postman. Then, you need to analyze the options and see what headers the server sent for authorization.
You can check out the following image, which has the URL pasted as cURL (Bash):
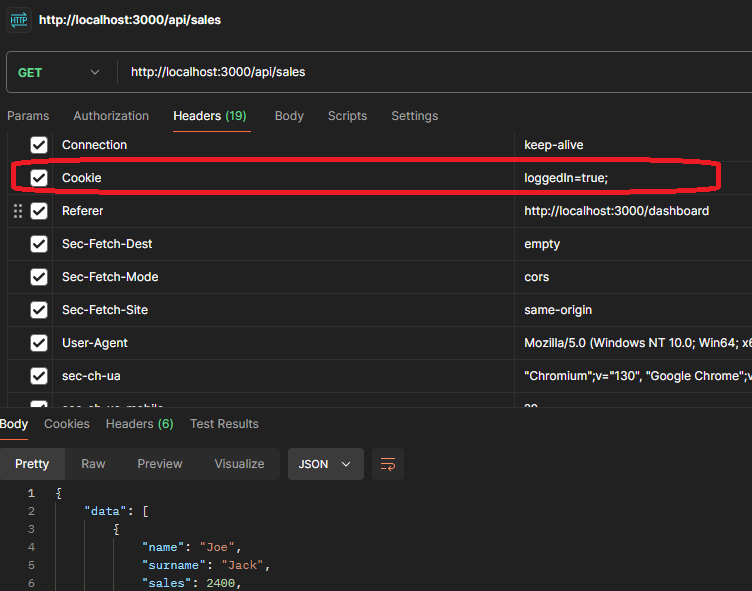
In the image, you can see that you have added 12 extra headers, and you can check them and analyze them. Sometimes, you might find an authorization header. Other times, you might have other token headers that you need to consider.
When you notice the header responsible for authorization, you need to go back to the website and analyze it from the beginning to check which endpoint provides the related authorization. You did it the hard way at the beginning to enable you to understand how to authenticate if the cookies were a token or something that would be challenging to figure out.
As you will see in the next section, website authentication is getting more complicated daily, and you must be ready to try all of the methods.
Next Steps: Authorization and Authentication
Authentication and security are significant issues. As you noticed on the website, you had to use the cookies to show authentication, which would be valid for some websites.
Other websites might have more advanced encrypted methods to authenticate and authorize. For those situations, basic knowledge and curiosity will help you explore and use the APIs from the website.
Some websites use the OAuth standards to authorize, saving a token on the website to send requests. As you move forward and reverse engineer more websites, you will notice the different patterns and will be able to understand them and become better at this work.
Wrapping Up
This article was for educational purposes, which is why we used a clean website to help you see things quickly.
In real-world examples, things are complicated, and you’ll need to explore them more. But the main principles stay similar for all situations: one endpoint brings the authorization/authentication data and another that brings the related data.
Reverse engineering is not easy and requires a fair bit of patience, dedication, and persistence. As you can see, understanding the website takes a lot of time. Not all websites have clean API calls, and some have the calls mixed with a different number of files needed for the website, such as CSS scripts or even images. All you need is to be patient and try to think outside the box.
If you like this article, subscribe to my newsletter and follow me on Twitter.
Source: freeCodeCamp Programming Tutorials: Python, JavaScript, Git & MoreÂ


