Creating a kernel module in Linux might sound complex, but it’s quite manageable if broken down step by step. A kernel module is simply a piece of code that can be loaded into the Linux kernel to extend its functionality. Instead of modifying the kernel itself, you can create modules that add or modify features like device drivers or file systems.
In this guide, we’ll walk you through the entire process of creating, compiling, testing, and deleting a simple kernel module. Don’t worry if you are a beginner; we will explain everything in a clear and easy way!
Prerequisites
Before starting, ensure you have the following:
A Linux system (with root access)
Basic knowledge of C programming
Kernel headers and development tools installed
To install necessary tools on Ubuntu/Debian:
sudo apt-get update
sudo apt-get install gcc-12 build-essential linux-headers-$(uname -r)
Step 1: Create a Simple Kernel Module
Start by creating a basic kernel module that does nothing special, but can be loaded and unloaded from the kernel. Here’s a minimal example of a “Hello World†kernel module.
Create a file named hello.c with the following code:
#include <linux/module.h>
#include <linux/kernel.h>
#include <linux/init.h>
// Initialization function (called when the module is loaded)
static int __init hello_init(void)
{
printk(KERN_INFO “Hello, world!n”);
return 0; // Return 0 means success
}
// Exit function (called when the module is removed)
static void __exit hello_exit(void)
{
printk(KERN_INFO “Goodbye, world!n”);
}
// Register the functions
module_init(hello_init);
module_exit(hello_exit);
MODULE_LICENSE(“GPL”);
MODULE_DESCRIPTION(“Simple Hello World Module”);
MODULE_AUTHOR(“Tecadmin.net”);
Step 2: Create a Makefile
To compile the module, you’ll need a Makefile, which helps in building kernel modules correctly.
Create a file named Makefile in the same directory as your hello.c file:
obj-m += hello.o
all:
$(MAKE) -C /lib/modules/$(shell uname -r)/build M=$(PWD) modules
clean:
$(MAKE) -C /lib/modules/$(shell uname -r)/build M=$(PWD) clean
This Makefile tells the system to compile your module using the Linux kernel’s build system.
Step 3: Compile the Kernel Module
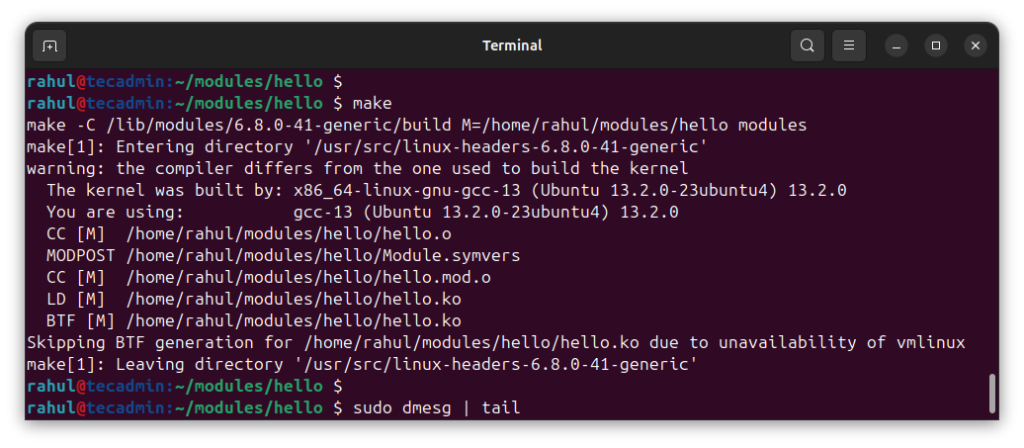
Now, compile the kernel module using the make command.
Open a terminal and navigate to the directory where your files are located.
Run the following command to compile the module:
make
If everything is set up correctly, this will generate a file named hello.ko. This is your compiled kernel module.
Create a Kernel Module
Step 4: Test the Kernel Module
Now, it’s time to test your kernel module by loading it into the running kernel and checking its output.
Load the module: Use the insmod command to insert the module into the kernel.
sudo insmod hello.ko
After running this, your kernel module should be loaded, and the hello_init() function will run.
Check the output: Use the dmesg command to check the messages logged by the module.
dmesg | tail
You should see the message “Hello, world!” in the output.
Remove the module: Use the rmmod command to remove the module.
sudo rmmod hello
This will unload the module and trigger the hello_exit() function.
Check the output again: Run dmesg | tail again to see the “Goodbye, world!” message in the output.
Step 5: Delete the Kernel Module
If you no longer need the kernel module, you can clean up the files using the make clean command.
In the terminal, run:
make clean
This will remove the generated files, including the hello.ko module, leaving only your source code (hello.c and Makefile).
Conclusion
Creating a simple kernel module for Linux is a great way to get started with Linux kernel development. By following this guide, you have learned how to write a basic “Hello World†module, compile it, load it into the kernel, and then remove it safely. While this is just a basic example, you can expand your knowledge further by creating more complex modules for tasks like device drivers or system calls. Keep practicing, and you’ll soon be comfortable working with the Linux kernel!
The post Step-by-Step Guide: How to Create a Kernel Module for Linux appeared first on TecAdmin.
Source: Read More

