This is a guest post co-written by Arnaud Briche, the Founder of Agnostic.
At Agnostic, our mission is to democratize access to well-structured blockchain data. We aim to provide a swift, user-friendly, and robust method for querying the vast volumes of data generated by smart contract blockchains. As a company, for performance reasons we first started with using bare metal service providers, but then decided to use AWS global presence to expand our business and achieve better reliability of our service.
One of the blockchain networks we support is Polygon, which is a high throughput network requiring low digit millisecond read operation latency on block storage volumes. This is critical to enable the blockchain client, Erigon in this case, to keep up to date with the latest state of the network. When we tested the Amazon Elastic Block Store (Amazon EBS) gp3 volume, we discovered that the tail latency can’t always meet our targets, and the EBS io2 volume has challenging cost-efficiency for our setup. Tail latency is the duration of the small percentage of response times from a system that take the longest in comparison to the rest of the response times.
In this post, we show an alternative solution we created to achieve the ultra-low-latency read operations that we needed.
Solution overview
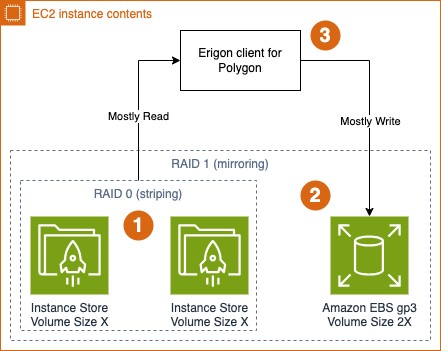
The solution we implemented combines the advantages of Amazon Elastic Compute Cloud (Amazon EC2) instance store volumes with general purpose durable EBS gp3 block storage. We chose to use instance store volumes as a cost-effective, low-latency storage option. These volumes are located on discs physically attached to the host computers and which allow us to use temporary low-latency block-level storage in some EC2 instance types. The following diagram illustrates how the overall solution works.
The solution consists of the following key components:
We selected an EC2 instance with multiple SSD-powered instance store volumes. To achieve even better latency, we combined them into a single striped storage using RAID 0 configuration.
To prevent potential data loss, we attached an EBS gp3 volume with the total size of the new RAID 0 array and set up data mirroring with RAID 1 configuration.
We also made the EBS gp3 volume write-mostly within the RAID 1 setup to make sure read operations will be served by the faster RAID 0 array of combined instance store volumes.
After setting up the RAID arrays, we installed and configured an OpenZFS file system to benefit from its built-in data compression feature and further optimize space consumption.
We also created an AWS CloudFormation template with a user-data script to simplify deployment and configuration. To try a preconfigured instance similar to ours in your AWS account, use the following stack:
Make sure you review all the configuration parameters and select I acknowledge that AWS CloudFormation might create IAM resources with custom names.
Note that this template will deploy resources outside of free-tier and will incur additional costs. You can estimate the costs based on the infrastructure considerations we discuss in the next section.
Solution deep dive
We chose the i3en.6xlarge instance model that comes with two NVMe SSD instance store volumes 7500 GB in size each. We then attached an EBS gp3 14000 GiB volume to match the combined size of the instance store volumes. We also used Ubuntu Linux version 20.04 for simplicity. Then we finished the setup using the following steps:
Configure the RAID 0 array with instance volumes:
Configure the RAID 1 array between the combined instance store volumes and the attached EBS volume with write-mostly setting:
Install the OpenZFS file system on Ubuntu Linux version 20.04:
Configure the OpenZFS file system with compression for the new RAID0+1 array:
The new data volume will be mounted to the file system under /data, and we continue with deploying archive node with Polygon Erigon client.
If you used our sample CloudFormation template to create your instance, the user-data script automates the preceding steps for you.
After the deployment is complete, you can connect to your EC2 instance using Sessions Manager, a capability of AWS Systems Manager. For more details, see Connect to your Linux instance with AWS Systems Manager Session Manager.
Then you can check the storage configuration using the following commands.
Check the size of the new /data volume:
Get a summary of all RAID configs:
Check the configuration of all block devices:
Get the OpenZFS configuration of your new /data volume:
Then you can continue with installing your own Erigon client for Polygon. Make sure you configure /data in the –datadir parameter and add inbound rules to open ports 30303 and 26656 in the security group associated with the new EC2 instance.
Cleanup
To delete all resources deployed with the “Launch Stack†link above, navigate to CloudFormation service in your AWS console, select the stack you have deployed (default name is “single-bc-node-with-RAID10â€) and click “Delete†button in top-right.
Conclusion
In this post, we shared how Agnostic successfully created a node that matches the speed of a bare-metal setup while significantly enhancing durability and enabling us to efficiently back up and replicate data for rapid node provisioning. This achievement exemplifies the convergence of top-tier performance and unmatched flexibility. Learn more about Agnostic Engineering and, if you have further questions, please ask them on AWS re:Post with the tag “blockchain.†If you have trouble with the provided CloudFormation template, open an issue with the AWS Blockchain Node Runners repository on GitHub.
About the Authors
Arnaud Briche is the Founder of Agnostic. His specialties are building and managing distributed systems at scale.
Nikolay Vlasov is a Senior Solutions Architect with the AWS Worldwide Specialist Solutions Architect organization, focused on blockchain-related workloads. He helps clients run the workloads supporting decentralized web and ledger technologies on AWS.
Source: Read More


